
This post is a complete guide on how to use the never version of Google Search Console (the old Google Webmaster tools) and how to analyse all its features to take full advantage of its benefits and understand what can be done in each section.
Due to the recent interface change, many people have been struggling to understand how the new version works and where to find the functionalities they used in the previous version. The purpose of this guide is to help you out. In addition, I will tell you various tips and tricks to improve your SEO.
What is Google Search Console and what are the differences with the previous version?
Search Console is the free and advanced application that Google puts at your disposal for the advanced analysis and SEO optimisation of your website. With it, you can analyse and execute all kinds of essential aspects and actions to monitor and optimise everything that has to do with your SEO.
In the new version, the first thing that is obvious is a new, cleaner, and minimalist interface, which you will have to get used to if you’ve been using the old version for some time.
Apart from the aesthetic change, Search Console now gives you more detailed information on specific pages of your site, such as canonical URLs, mobile usability, and more. The new version also offers you new and improved tools and reports, giving you a more precise and visual presentation of the essential information.
Also, with the new version of Search Console some elements seem to have disappeared, but they have actually been integrated into other functions (e.g. crawling errors and structured data).
This post will go into detail, talking about each functionality so that you clearly know the differences between this version and the previous version. However, first, I will explain how you can install Google Search Console on your website, taking into account that the way you register has changed since the update has been made.
How to register you website in Search Console?
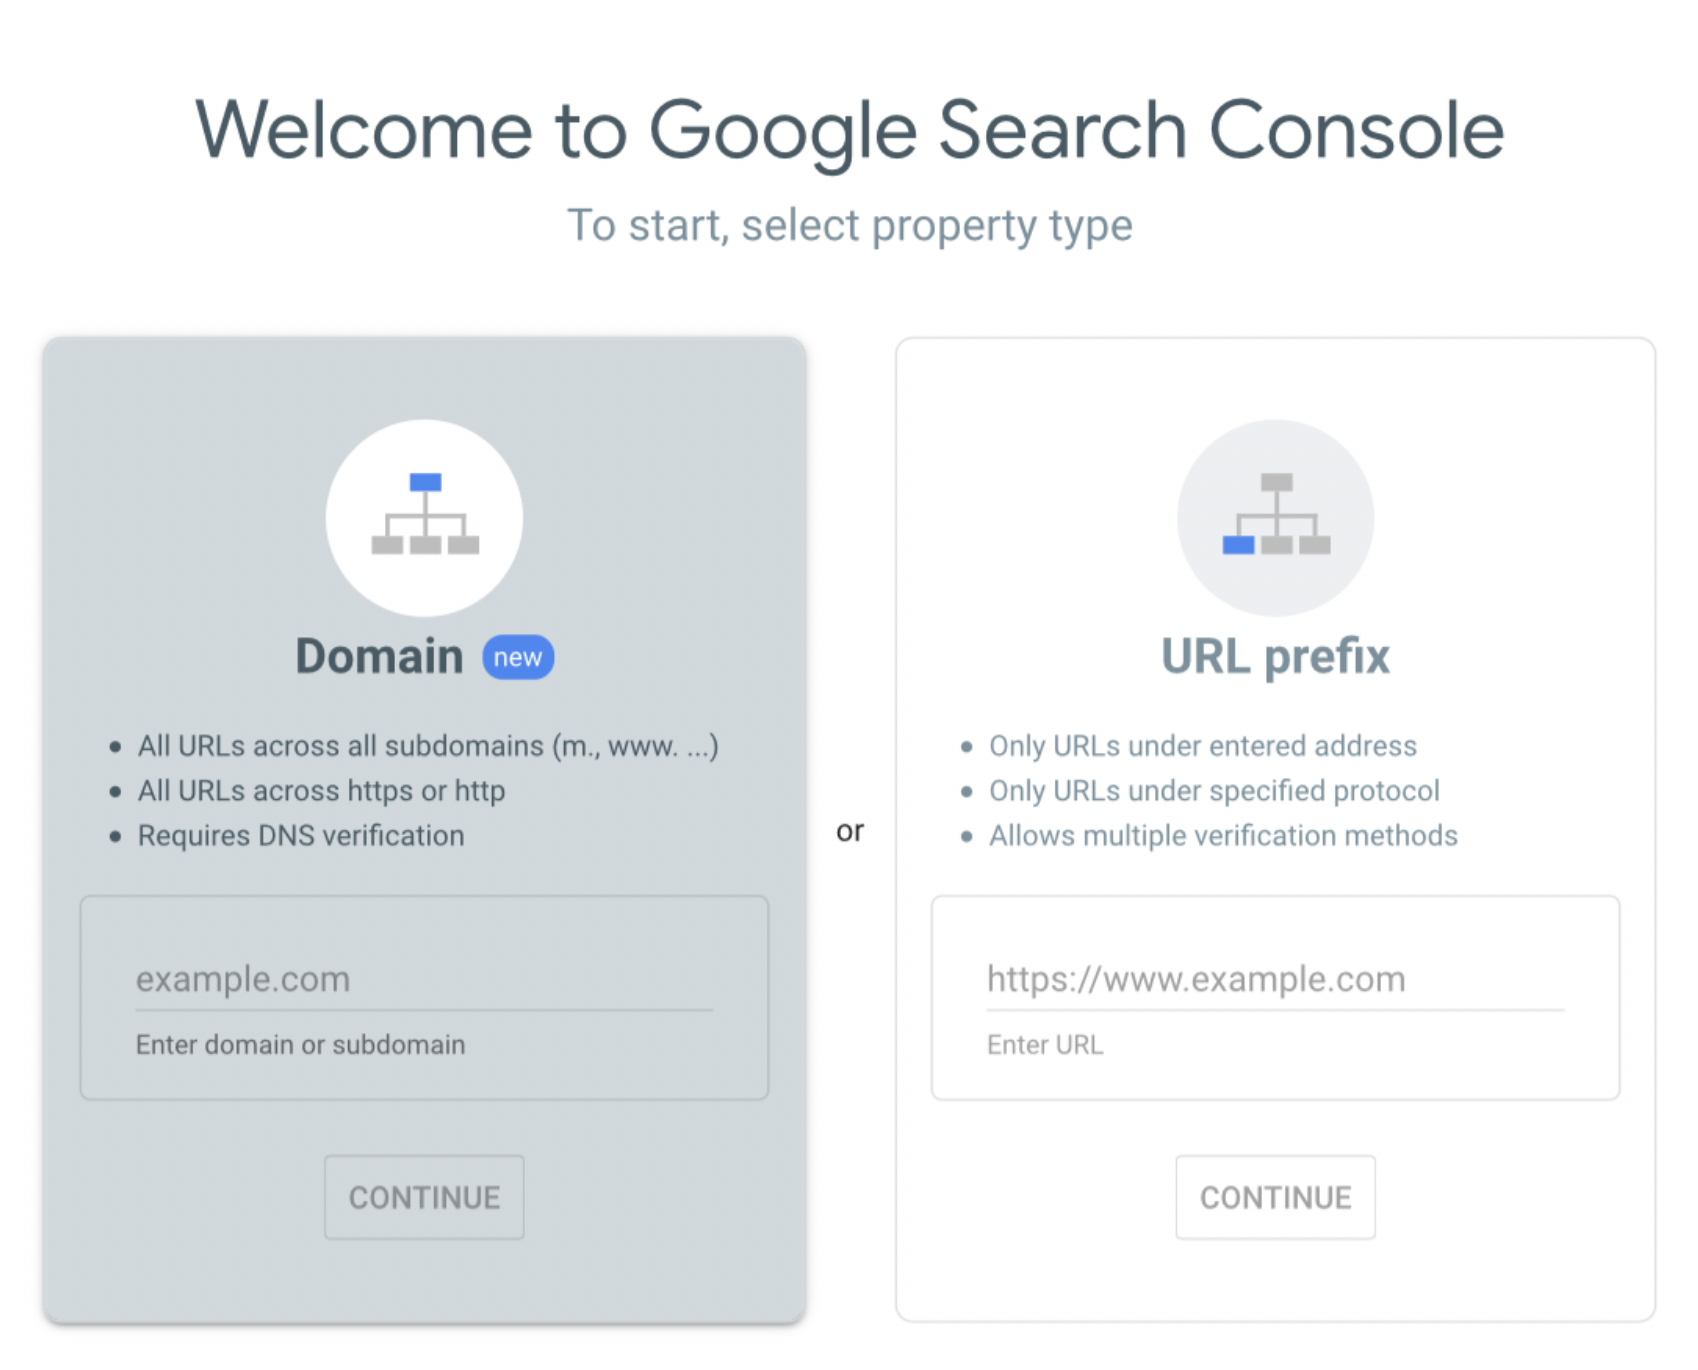
To install Google Search Console on your website you have to go to Google Search Console page and then click ‘Start Now’ to log in with your Gmail account. If you don’t have one, create your Gmail account first. Once inside, the first thing they ask you is if you want to add an entire domain to the Google Search Console or just some specific URLs.
Complete Domain
Type domain.com (which is the option on the left, as seen below). This must not include the http or https protocol or the final (/) bars. In this way, you will be registering all version of your domain at the same time, with or without https, with or without www, with or without subdomains, etc. That is, in this way you are adding all the variants of your domain to monitor everything together.
Version of your Domain
To register a specific URL or directory of your website, you must use the option on the right.
How to install Google Search Console on WordPress.org?
To install Google Search Console on your WordPress.org website you can do it in several ways:
DNS TXT record (only for adding the entire domain)
This options is the only one available to add the complete domain with all its variants (that is, if you have chosen the domain option on the left in the graphic above).
To do this, you must copy the code provided by Google and paste it in the DNS management zone of your domain in the TXT record (you can find this in the admin panel where you host the domain). Once you have done this, go back to the Search console and click Verify.
Note: this method can sometimes take a little longer to work (at most, a day or two), although it depends. If you try to verify and it doesn’t work straight away, come back in a few hours and try again.
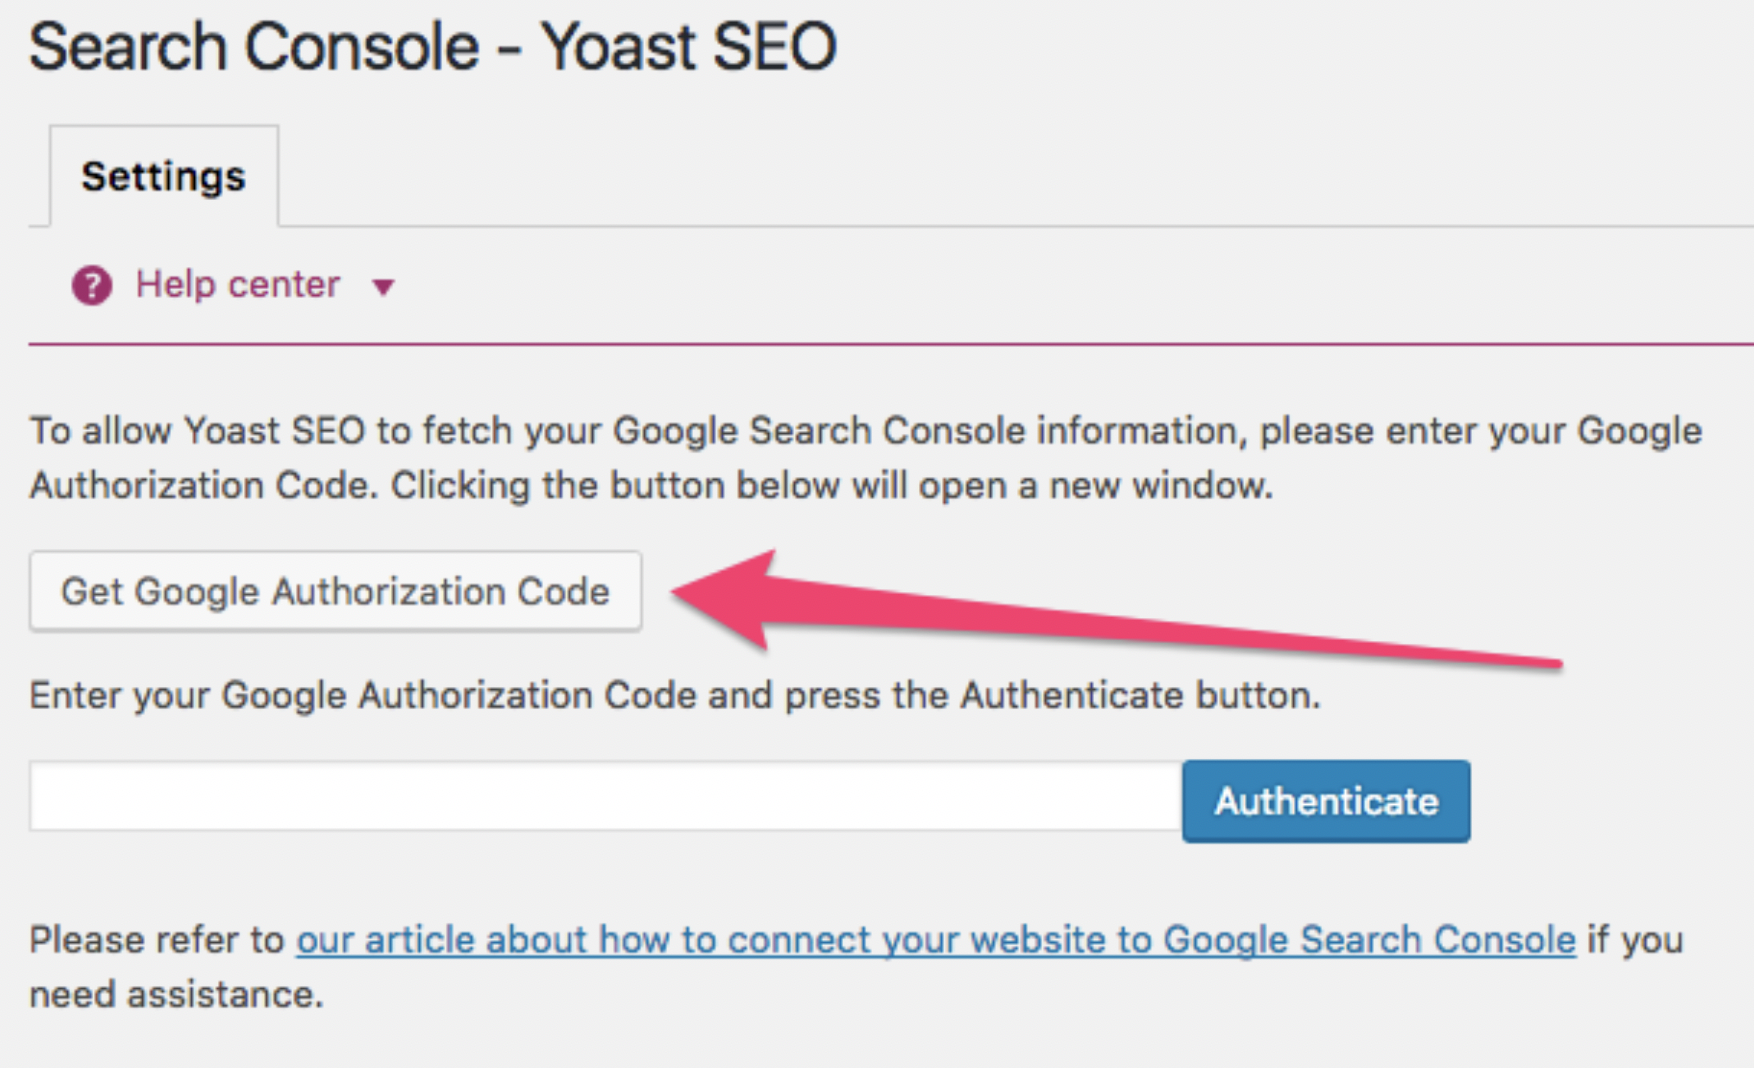
With the Yoast SEO plugin
Among its huge number of free options, this wonderful plugin also allows you to connect directly to your Search Console account. To do this, you first have to obtain the authorisation codeand then you must paste that into the ‘authorisation code’ box of the plugin itself. Then you press authorise, that’s it.
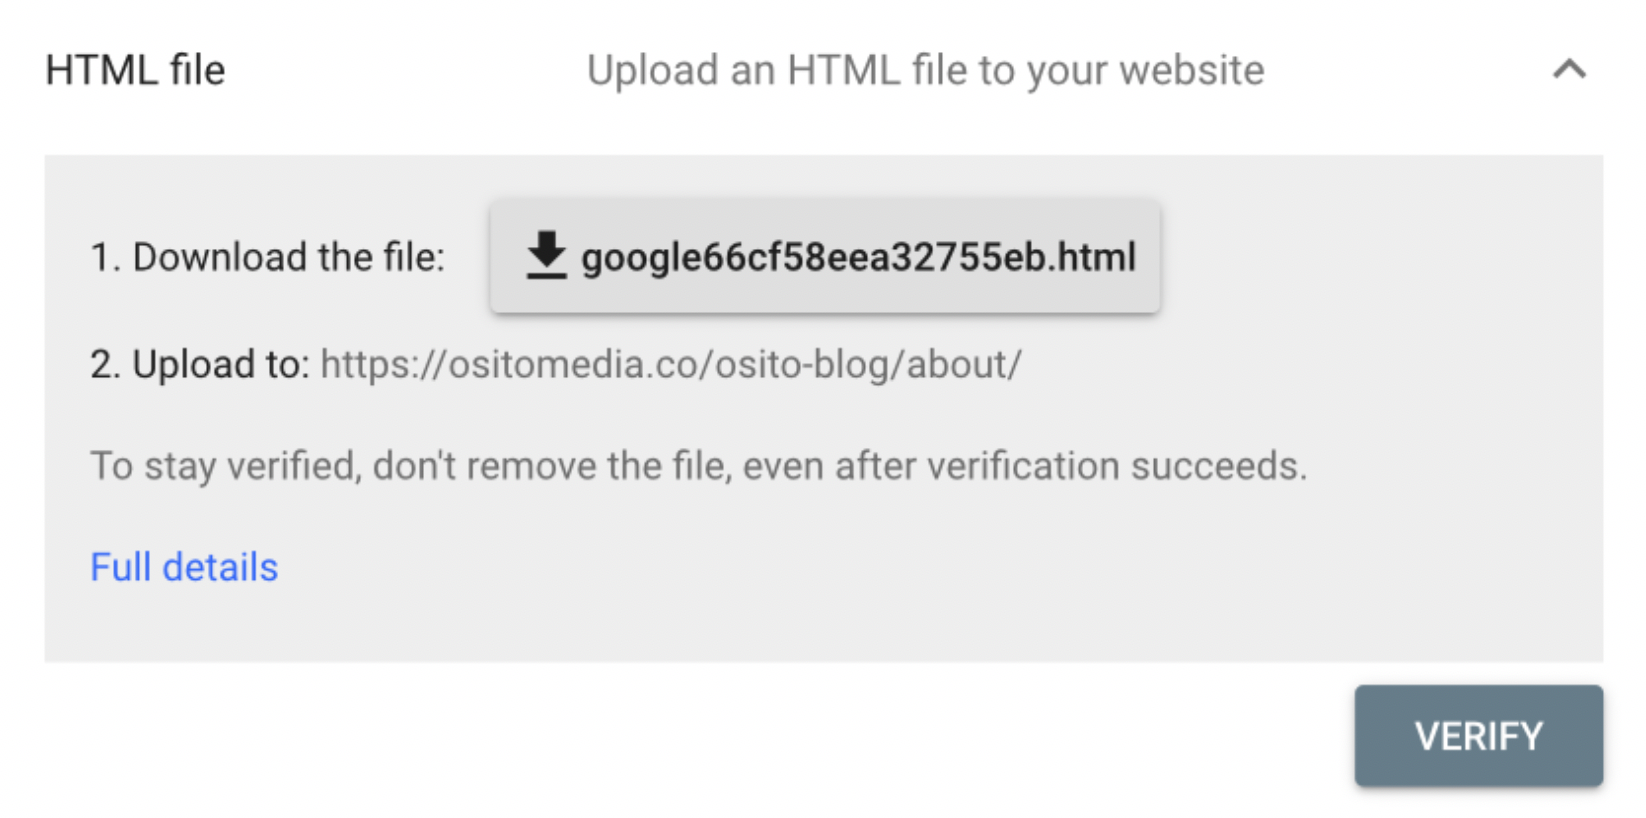
Uploading the HTML file via FTP or file manager
This alternative verification method is only for the second option (to add specific URLs and not the entire domain). Through this method you download the given file and then upload it to the root of your website’s directory. Once you have done this, you return to the Google Search Console and click verify.
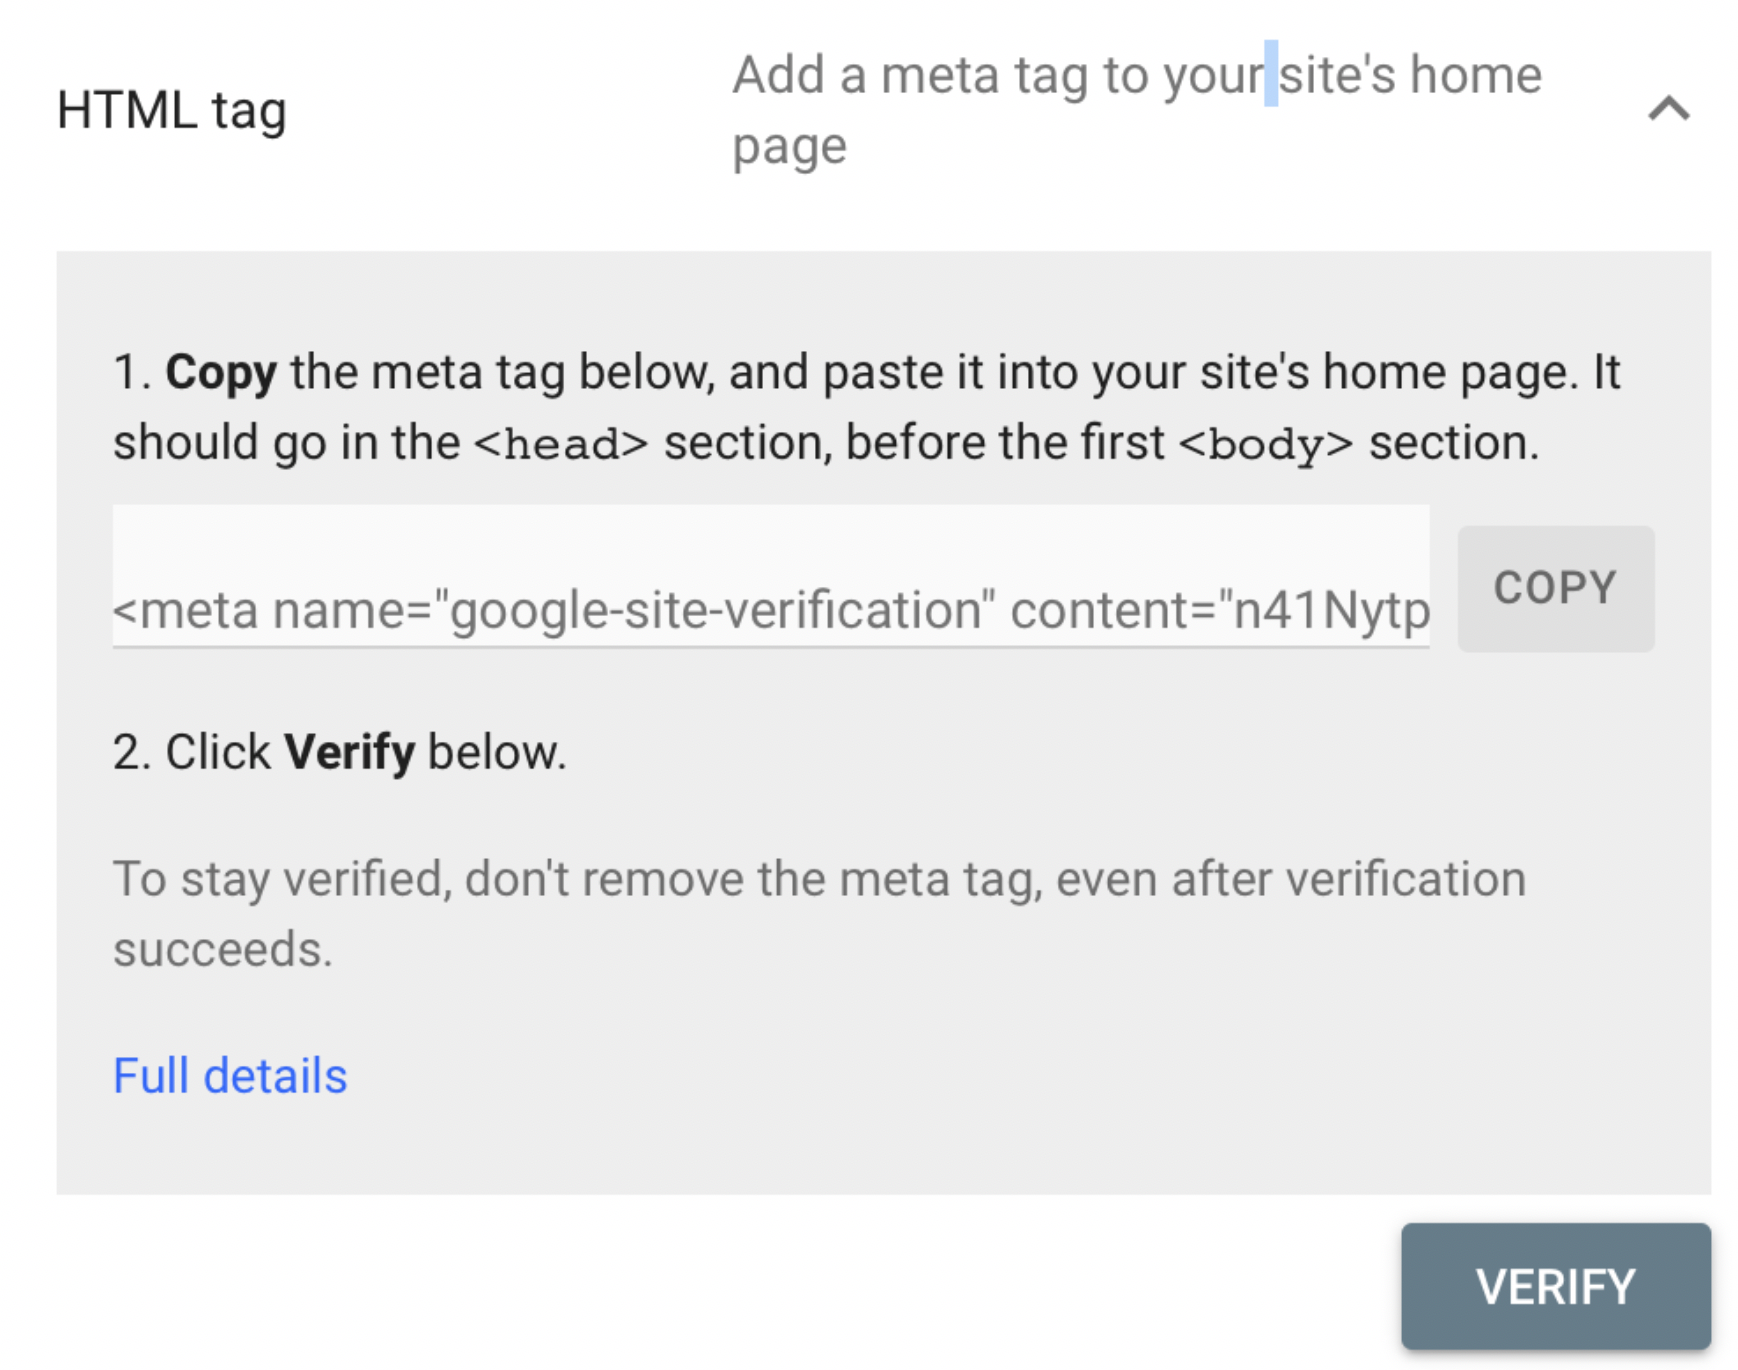
Paste the HTML Tag in the <head></head> section of your website
This other, alternative, verification method is also for the second option (to add specific URLs). To do this, you must copy the tag that begins with <meta name… and then paste it in your header.php file between the opening <head> tag and the closing </head> tag.
The path to access this file, within your WordPress installation on your server, is usually in wp-content/themes/name of your template/header.php. You edit that file (make sure you download the header.php before modifying it to ensure you can restore it in case you make a mistake), then paste the meta tag, save it and off you go. Now you can go back to the Search Console and click verify.
With Google Analytics
Through this method you copy the tracking code gtag.js snippet. And paste that between the <head></head> tags in your header.php file within your hosting (as explained in the previous section). Then click verify.
With Google Tag Manager
This verification method works using the container snippet. To do this, you must configure and install Tag Manager, then create a Tag Manager container, and then associate your account with the created container.
Next, you have to place the <script> code snippet in the <head></head> section of your header (as explained in previous sections, above), preferably as close as possible to the <head> opening tag.
Then place the <noscript> code snippet immediately after the <body> tag of the HTML of your web page (the part of your code that corresponds to the main body of your web content). Accessing this tag is more difficult and its location depends on your template. I recommend you ask someone with knowledge of PHP and HTML code for this task. The advanced and complete explanation may help you with this task too.
How to install Google Search Console on a custom website (HTML, PHP, etc.)?
If you have a custom-made website with code(usually HTML or PHO), you can verify using any of the methods above, with the exception of the second method, which is exclusive to WordPress.org as it is done through a plugin (Yoast SEO).
That said, whatever method you use is your choice. Keep in mind that if you have a pure HTML website, each URL has its own <head></head> tag. Therefore, if you used the HTML Tag method (or Analytics or Tag Manager), you would have to paste the meta tag on each and every page one by one, which would be quite tedious and would also make it difficult to modify later.
However, if your website is in PHP, you may have a file or segment of code that allows you to paste the relevant code once, and that will then be automatically applied across all your web pages, making much easier to modify at a later date if need be.
How to use Google Search Console
The new interface of Search Console has changed a number of different elements and where you find them, hence why a detailed review is necessary so you can use this awesome tool properly.
In general terms, the interface is now cleanerand far more friendly, since it presents the different sections in a more orderly and simplified way.
On the other hand, there are features that have not yet been implemented in the new version, which forces you to continue using the previous version for these specific cases. For example, in the new Search Console you no longer have a section to Delete URLs, which was an efficient way to de-index URLs.
Detailed explanation of all the functions of the new Search Console
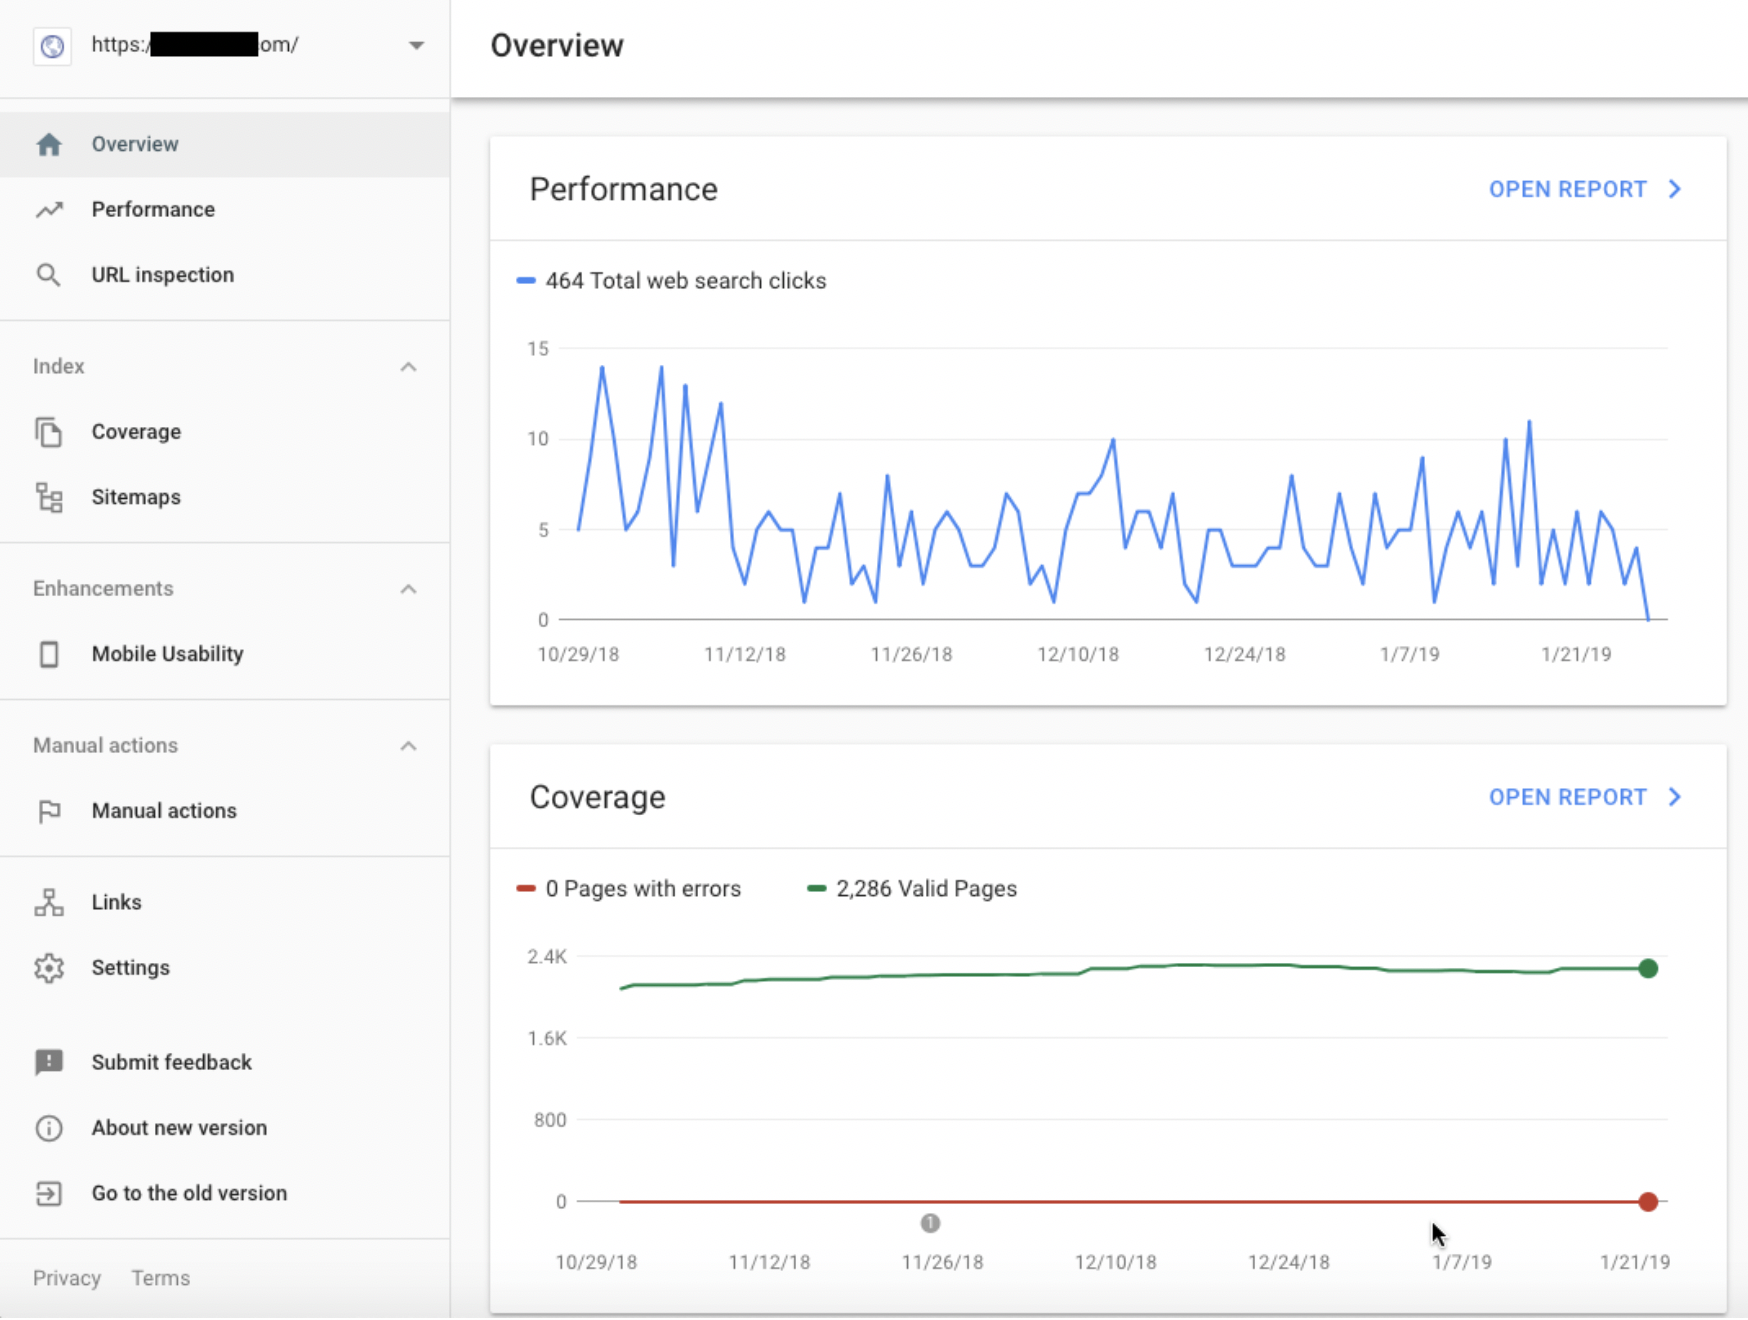
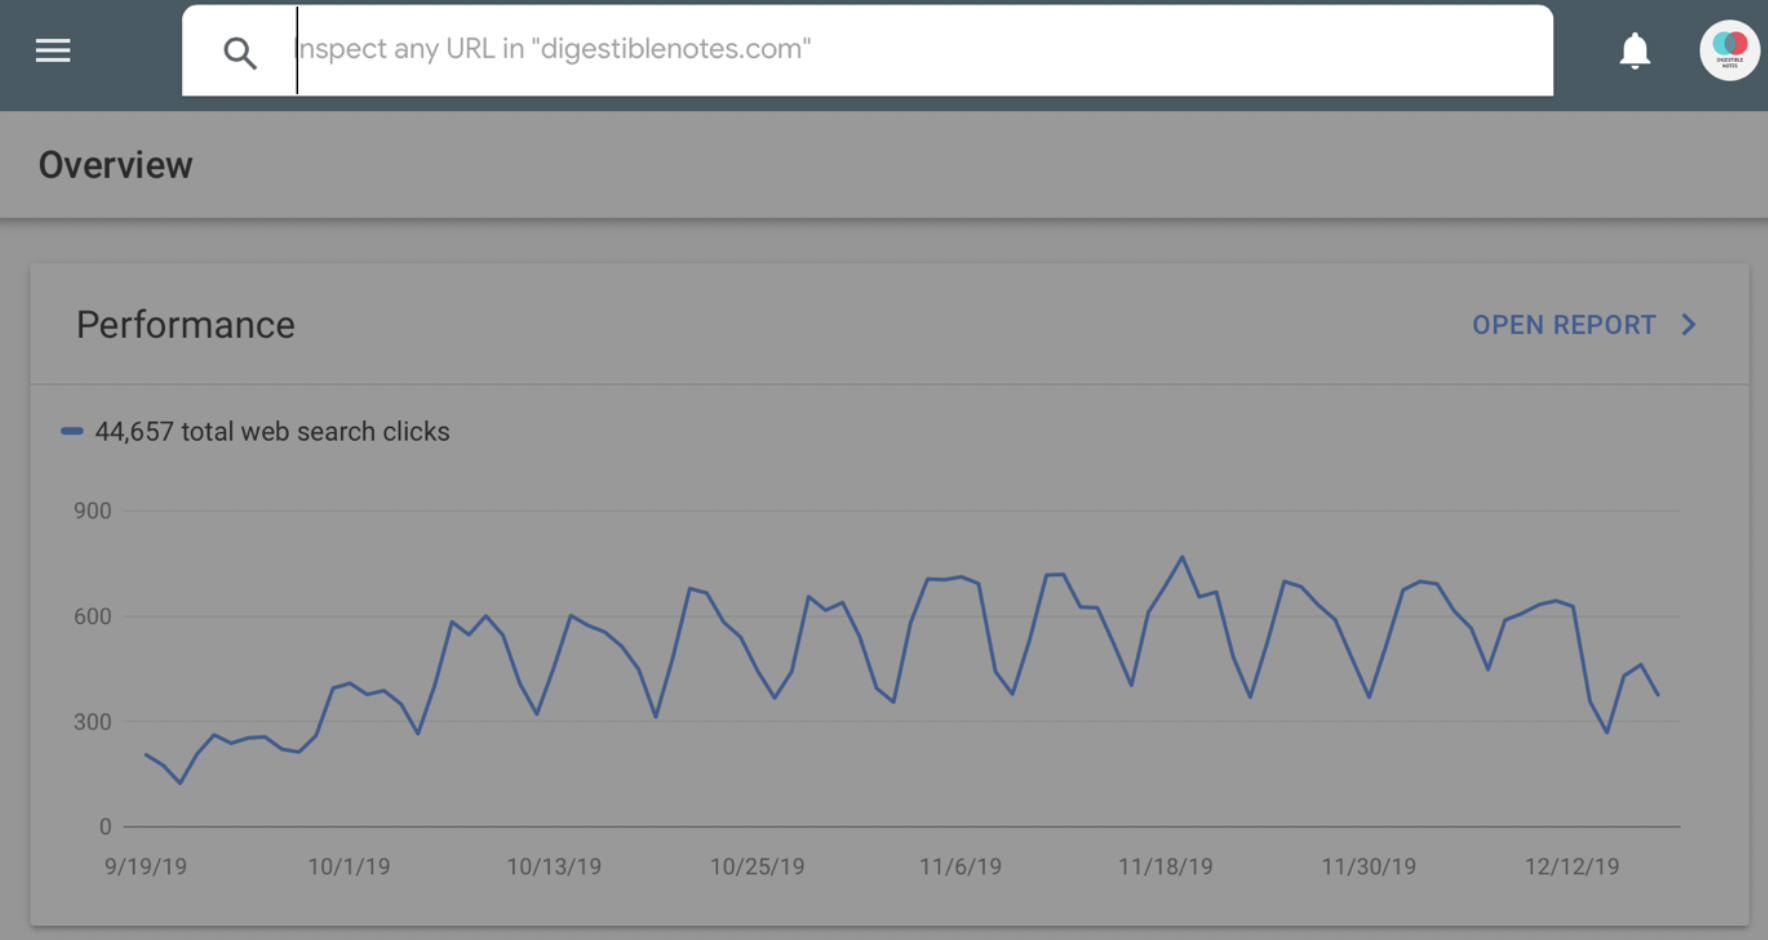
Overview
This is the overview section. Here you have a summary of basic questions and general information about your website.
Performance
In this section, you can check the SEO performance of your keywords: that is, what positions your keywords occupy, how many impressions (i.e. views) and clicks they generate and, therefore, what CTR (i.e. click through rate) you get for each of them. This section is equivalent to the old ‘Search Analytics’ in the previous Search Console:
Total clicks: the total number of clicks that your URLs have received from users on Google in a given period of time
Total impressions: the total number of times your URLs have appeared as search results on Google
Average CTR:average percentage of clicks with respect to the total impressions received by your URLs in Google
Average Position: the average position of all your URLs that appear on Google
This is a very valuable section when analysing your SEO, since you can see - in detail - your organic performance and draw up strategies in order to optimise positions and CTR of the keywords that already have a certain positioning. Therefore, it is a section that you should visit periodically
To display all of the data on clicks, impressions, CTR, and position, you must click on each of the four coloured boxes that you can see in the graph below. This will cause all the available data to be shown within the graph.
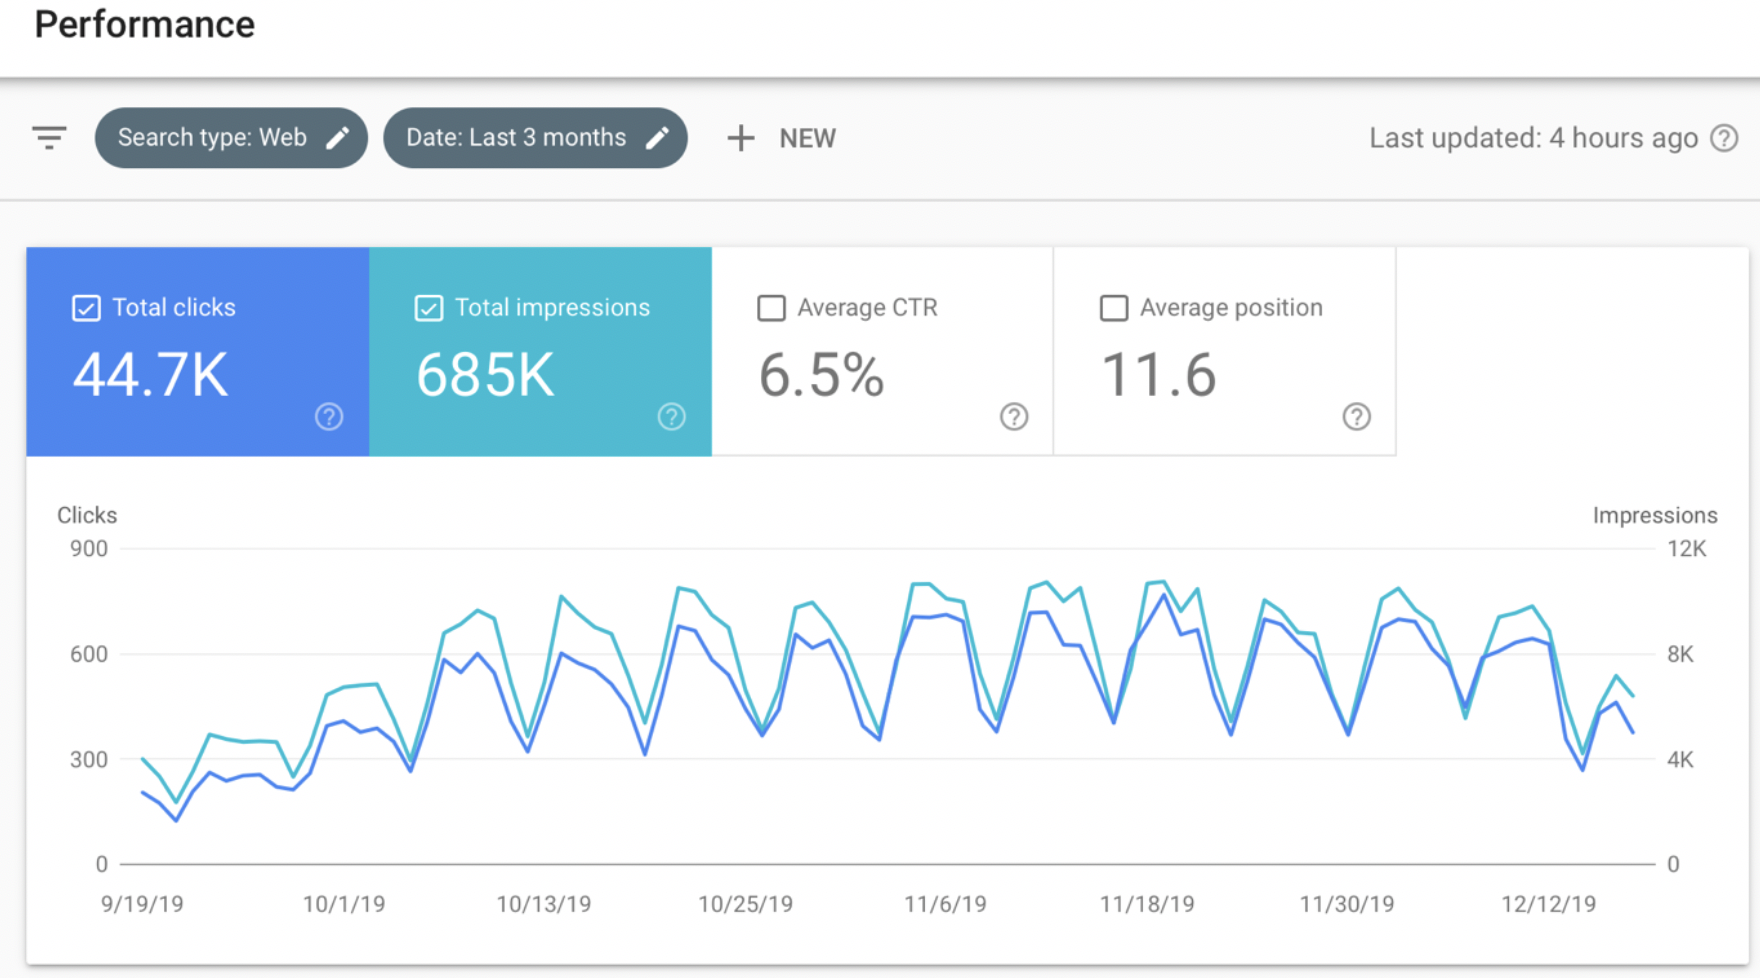
The main difference between this and the previous version is that now the period of time you can analyse is no longer limited to 3 months (you can now see up to 16 months, allowing you to access more extensive data). To modify the time period shown, you have a small menu above that allows you to filter the results by dates.
In addition, there are new filters by pages, countries, and devices, so you can get even more accurate data on the performance of your keywords according to various criteria
What things can you do to improve your SEO with the performance report?
The performance report can be very profitable for your SEO, so I am going to show you some tricks and tips to optimise the search engine ranking of your website.
1. Optimise the keywords of your pages
First, select the four parameters above the graph (total clicks, total impressions, average CTR, and average position).
Then, click on the pages filter below the graph. This will show the SEO performance of all the URLs on your site. From here you can optimise any URL, but especially look out for URLS for which you have many impressions but a low CTR and between 1-20 position, which indicates that the URLs are potentially profitable business opportunities.
That is, they are pages of your site that position on the first page of Google (position) through keywords on which there is a lot of search intention (impressions), and for which you could earn a greater CTR optimising their titles and meta description, and also raising their positions by optimising on-page keywords.
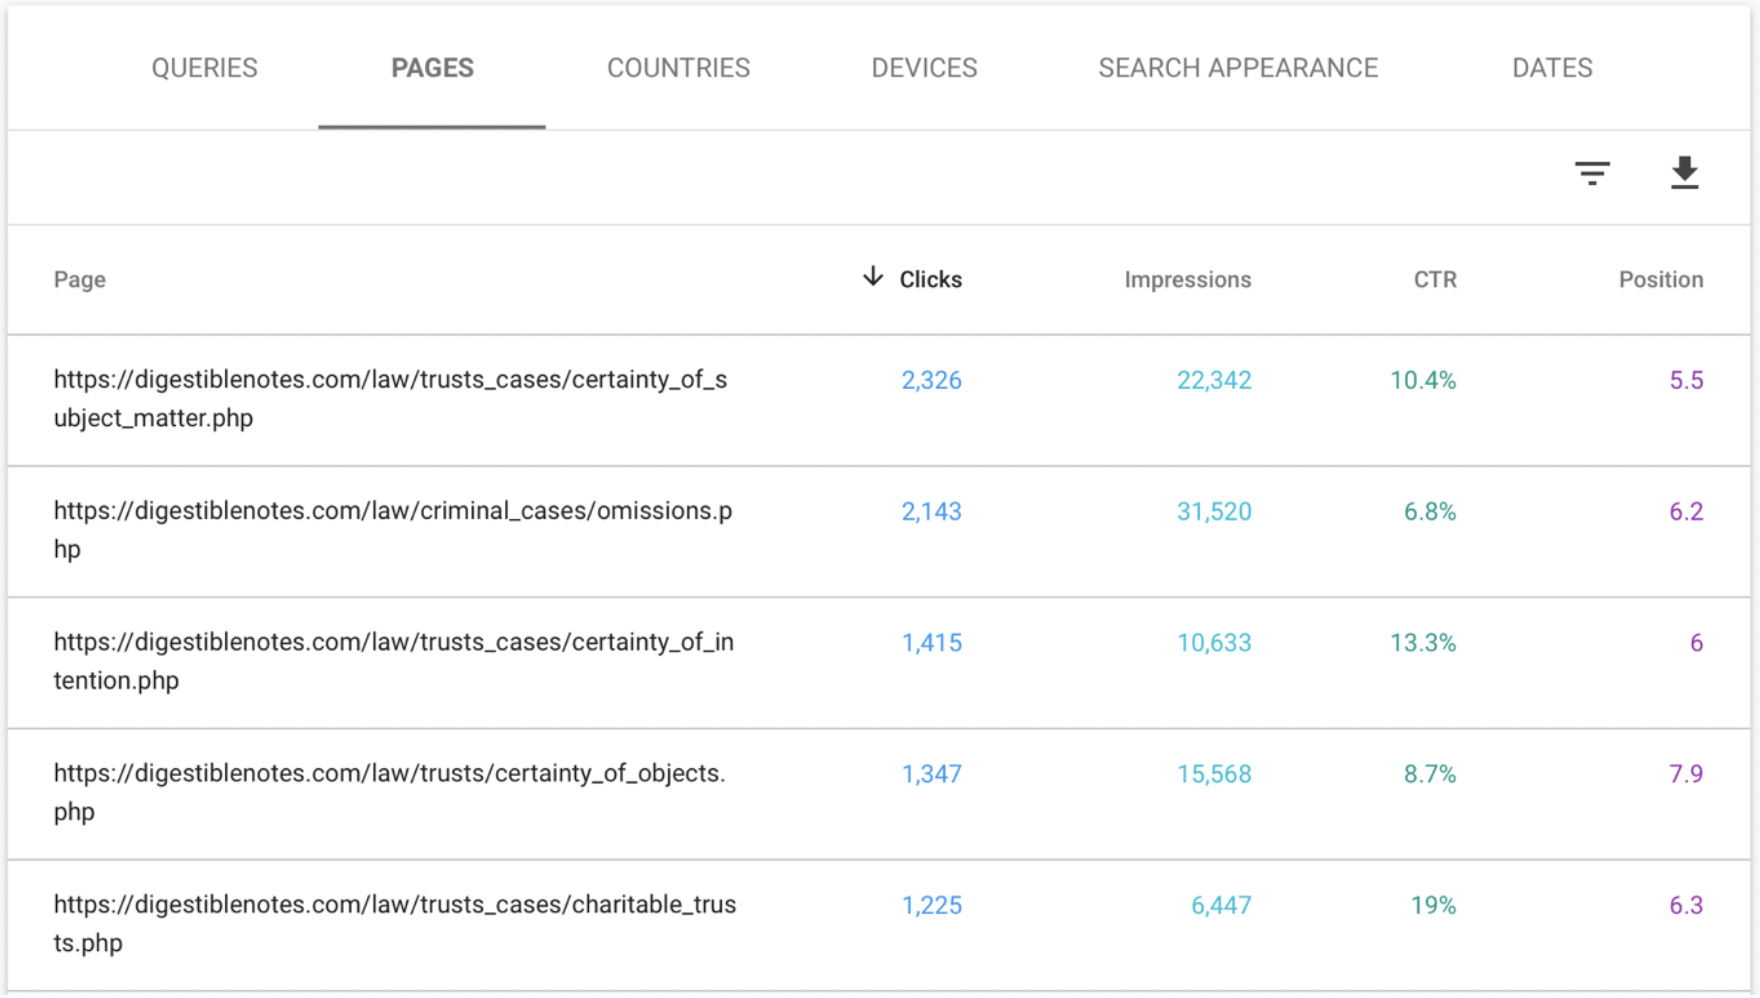
In this example you can see that there are a few opportunities to optimise the URLs of this website, since it meets the requirements above: there are a decent number of impressions, a good position on Google, and perhaps a slightly low CTR.
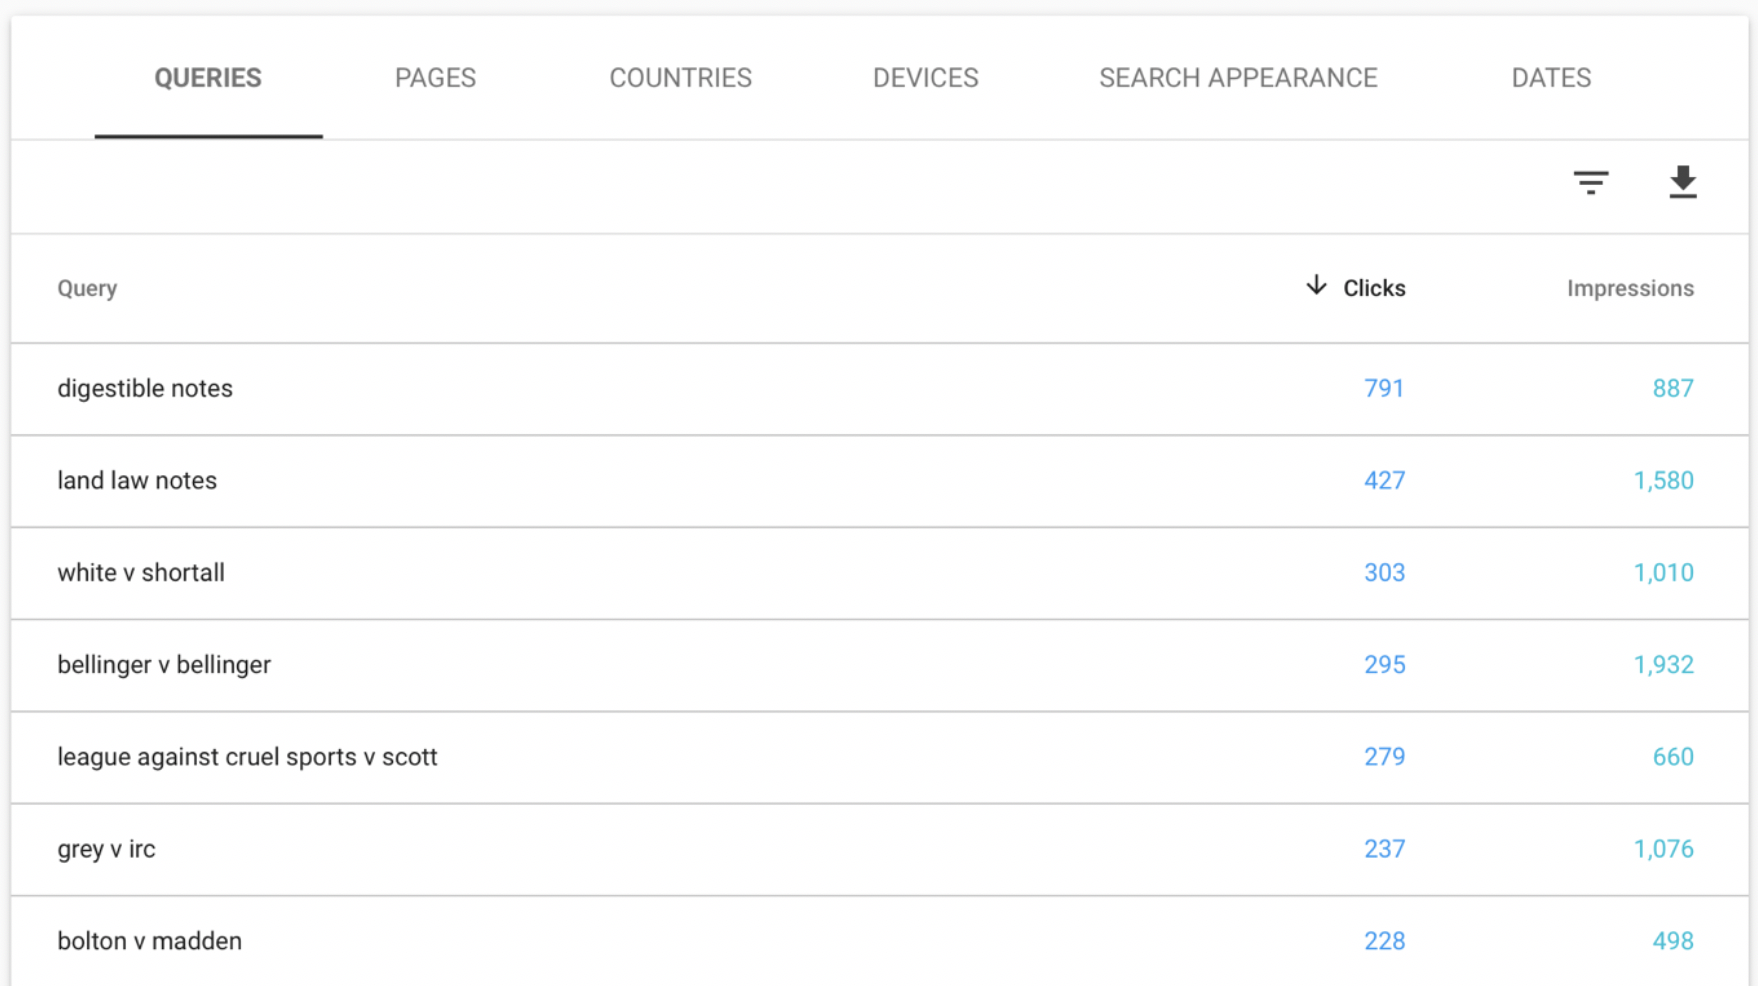
Now, click on the URL you want to optimise and click on the queries filter (we will use the first URL in this example). This will show all the keywords that this page positions, and here keywords will appear that you have not even tried to intentionally optimise.
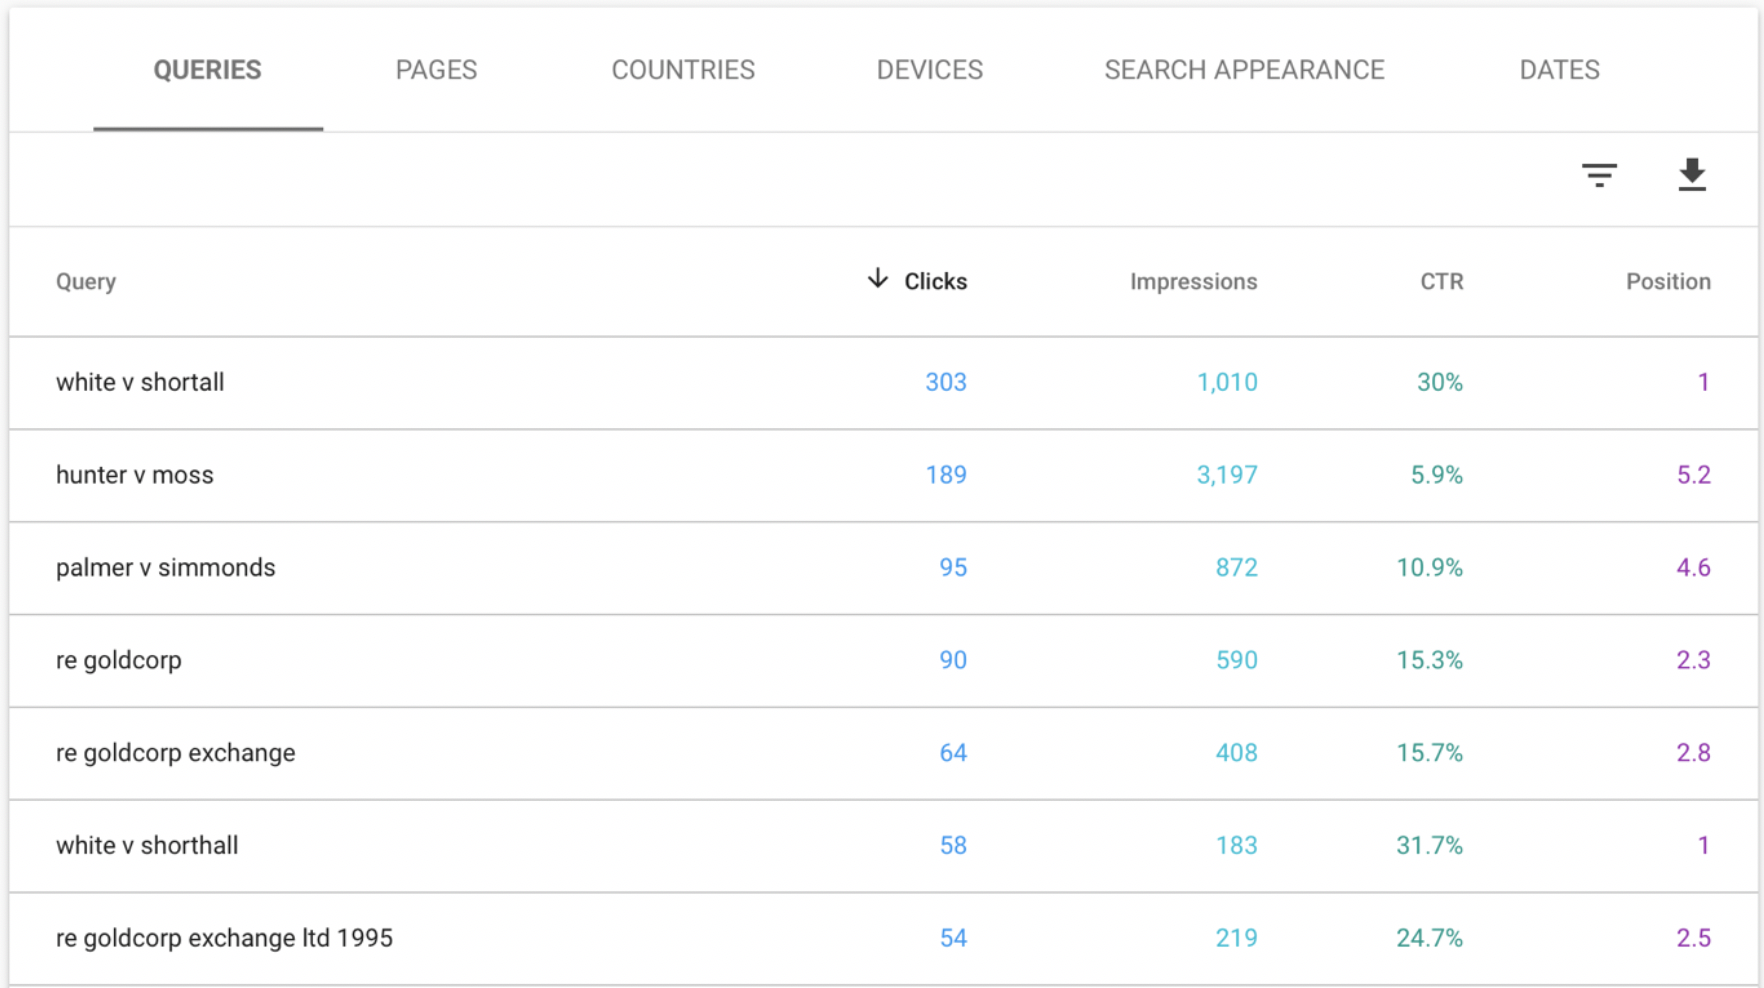
Next, order the list from highest to lowest by clicking on ‘impressions’. The reason: to optimise, I want to give preference to all those keywords that have greater potential profitability by having more impressions, that is, greater volume of searches that can bring in the greatest amount of traffic.
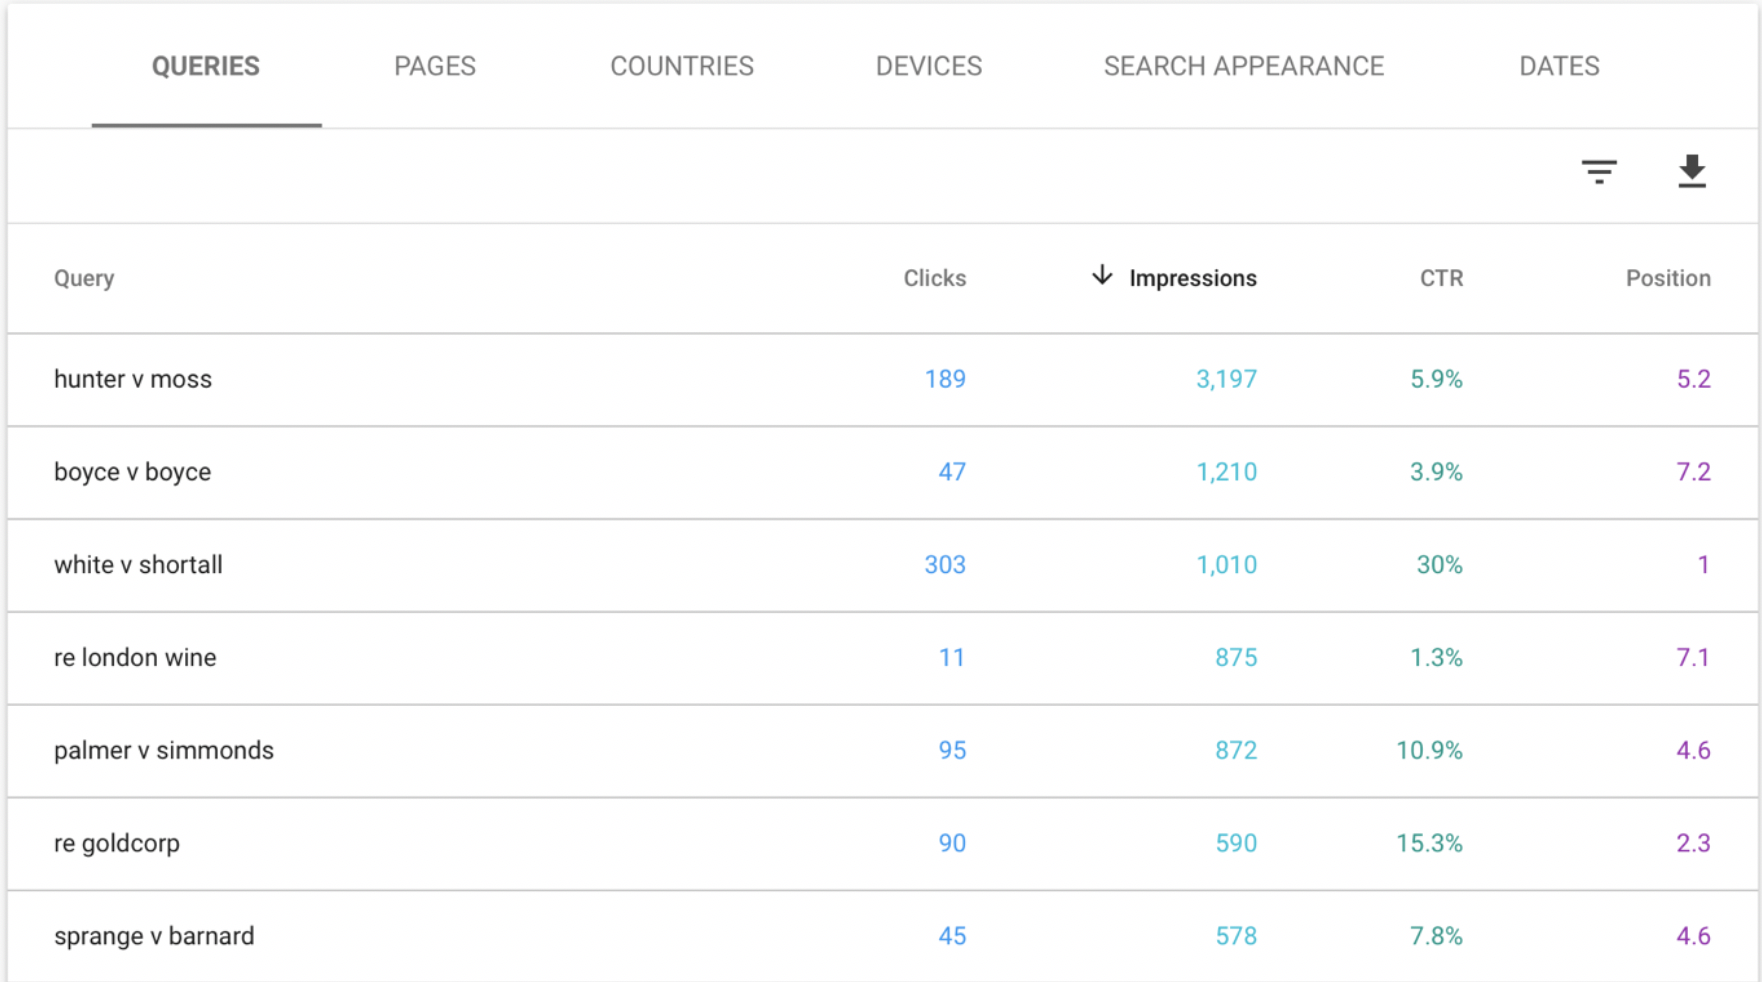
In the list of keywords listed from the highest to the lowest number of impressions, I am interested in optimising those keywords that, in addition to many impressions, have an average position between the 1stand 2nd page of Google (positions 1-20) and have a CTR that is slightly lower in comparison to others.
Through this, I will be promoting the keywords that meet the following requirements: they are potentially more profitable because they have many impressions, they are in high positions meaning success is easier to achieve, and they have a low CTR, which indicates there is room for improvement.
I can also sort by position to optimise the keywords that are closer to the first position, since they are the ones that are closest to achieving good results.
In the example above, one of the many keyword options to optimise could be ‘hunter v moss’, since it has 3,197 impressions and is in position 5.2 (on average between the 5thand 6thposition), which is quite close to position 1. Also, the CTR could be substantially higher, so it is an interesting opportunity.
Once the keywords that I am going to optimise have been chosen, how are we actually going to optimise the relevant keywords? The best way to do this is to increase the density of the keyword (without using it in excess of 2% of the total number of words on that page) and placing them in relevant places such as:
- First paragraphs
- Titles and <h1> tags
- Image alt tags
- Bold the keyword (although this isn’t particularly relevant anymore)
- Meta descriptions (this will increase CTR by optimising how your page looks on the Search Engine Results Page (SERP))
Once optimise, check periodically to observe changes in position. And don’t forget that SEO is a constant process of optimisation. Persistence and constant analysis is essential to improve your positioning.
2. Check if there is URL cannibalisation
If you have more than one URL positioning or attacking the same keywords, you could be falling into a cannibalisation problem, which is one of the most common SEO errors. When this happens, you should regroup your content into a single URL and redirect all those similar URLs to this main URL (to ensure you don’t lose traffic).
If not, if one of the pages isn’t relevant you can use a noindex or use the canonical label to indicate to Google that they are not relevant compared to the main page. In this way, you are more likely to achieve your SEO goals, since all the search intent is directed towards a single, strong, URL.
With the Google Search Console performance report it is easy to detect this problem. To do this, in the queries column, review your keywords by clicking on them one by one. Once you have clicked a keywords and you are inside the keyword, in the filter menu select pages to show the URLs of your site that have clicks/impressions/CTR and position for that keyword.
If you see that there is more than one page for that specific keyword and they compete heavily for the four parameters of clicks, impressions, CTR, and position, you have an SEO cannibalisation problem. Keep in mind that it is possible that you may have one URL that is well positioned for the keywords and another URL that has some impressions, but far lower in its position.
Sometimes that secondary URL is already working on a different keywords for which it positions well, but it also has some relevance for that keyword within the main URL because it has the keyword written somewhere in the text or receives a link to the page with the keyword in the anchor. Although this may happen, if it occupies a low position (and therefore has few clicks and a low CTR) there isn’t a problem, because it isn’t actually competing with the main URL for that particular keyword.
More Search Console Functions
URL Inspection
This is the section where you can inspect if your URLs are correctly indexed in Google. To get this information, enter each URL you want to analyse in the field above.
If everything is correct, the tool will show a message stating that the URL is on Google, as can be seen below. This means that Google has already crawled and indexed this URL. If I found a problem in coverage or usability, it would show it below and you could learn more information about the problem detected.
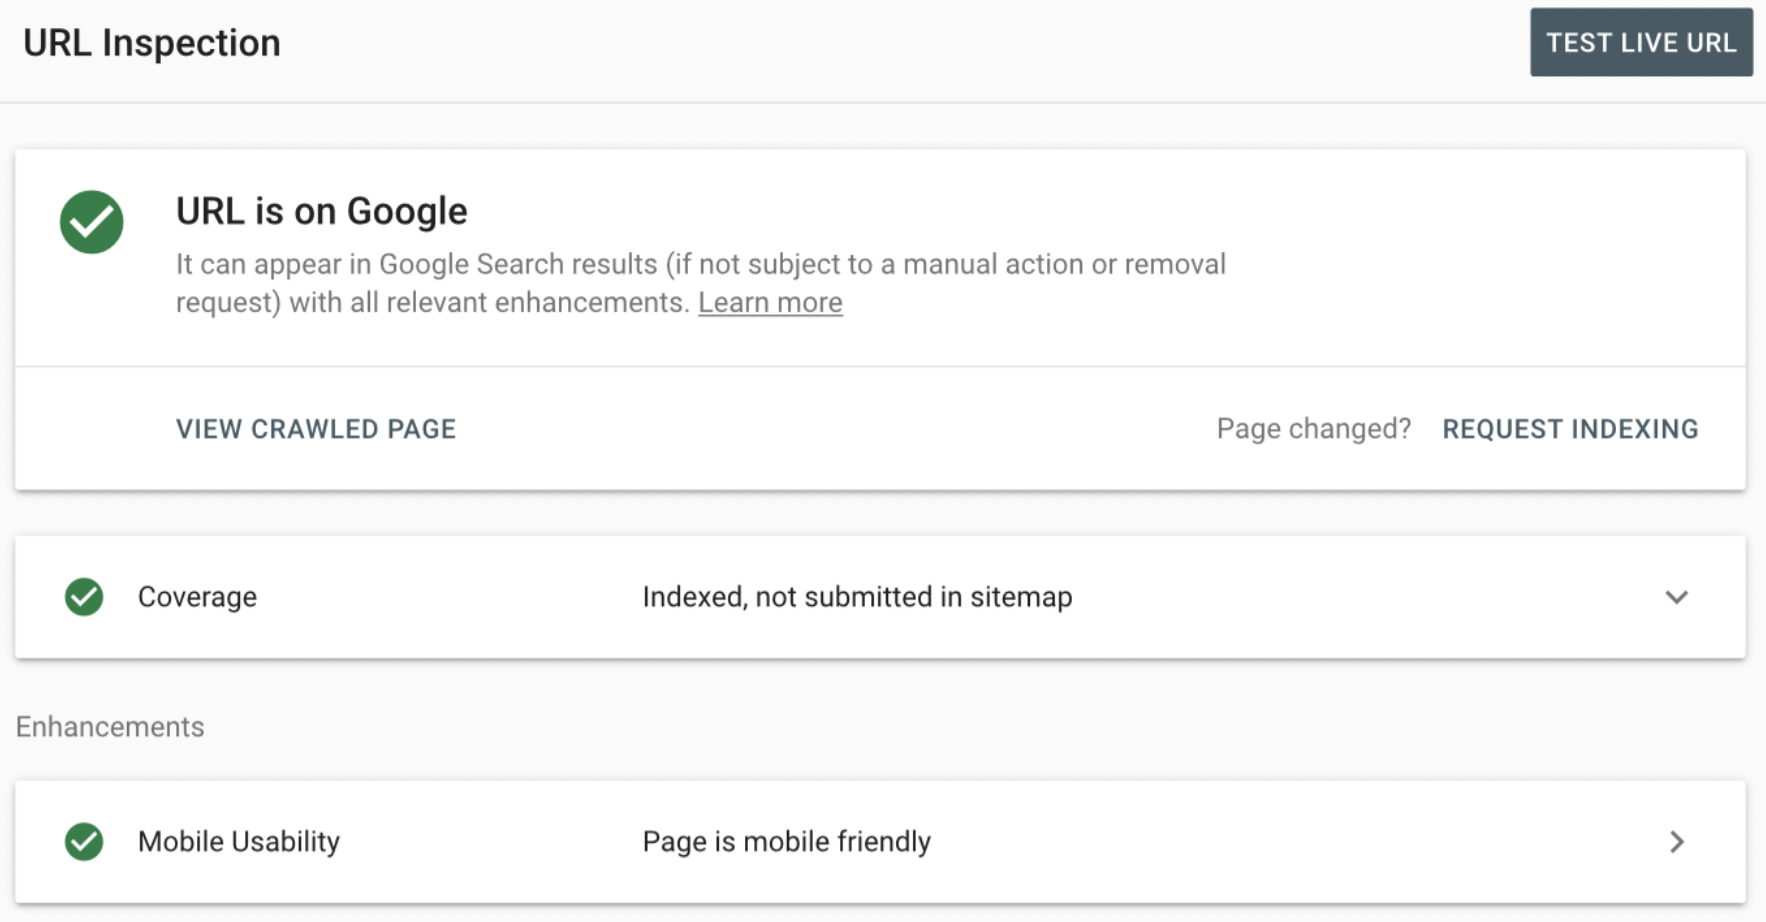
In addition, in ‘view crawled page’ you can see how Google sees the code of that page.
There is also another section that can be very useful for you: that is the option to request indexing, which allows you to request the indexing of your URLs that do not appear on Google yet.
In the coverage option, you can get more information about tracking and indexing your URL. Among other things, it alerts you if the URL is on the sitemap, the date of the last crawl by Google, the status of the meta robots tag (i.e. if the page is indexed or not), and what the canonical URL is.
Finally, in mobile usability, you can check if the URL is optimised for mobile devices.
The Test Published Version option is used to analyse what happens with a URL of your site that has not been indexed or has been modified. For example, you want to analyse an already indexed URL to which you just added the noindex tag. With this section you will analyse the status and the current code of the URL regardless of whether it has been indexed before or not.
Coverage
In this section you can analyse the indexing status of your URLs. That is, which ones appear on Google and which do not, and see why they may be indexing or not indexing by mistake.
As you can see in the graph below, the tool tells you if you have URLs with errors, valid with warning, valid, and excluded. And further down in the details section it tells you how you can solve the possible errors. Below I explain what each section means.
Errors: URLs that for some reason cannot be indexed and, therefore, do not appear on Google as search results
Valid with warnings: URLs that are indexed and appear on Google that you may not want to appear in Google, which could be an error
Valid: URLs that are indexed and appear correctly on Google
Excluded: URLs that you don’t want on Google
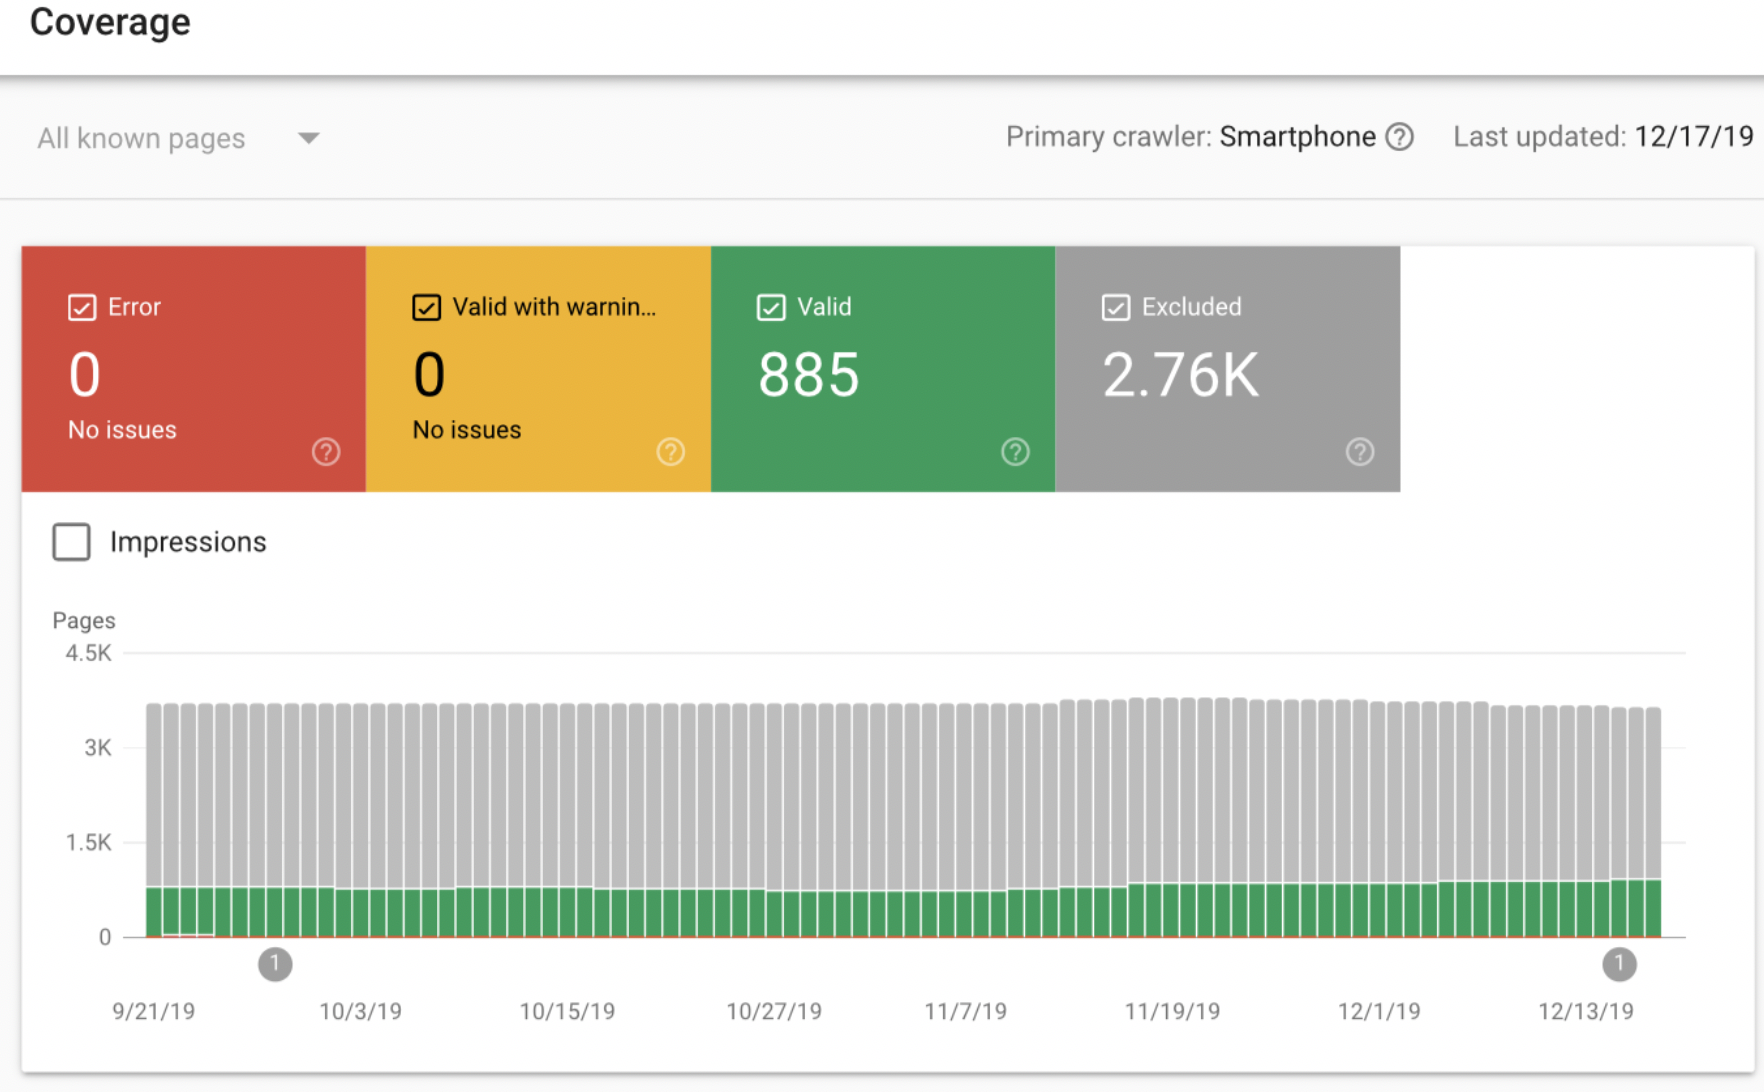
At the bottom, in the details list, the tool specifies the reasons why the URLs are valid for indexing or are otherwise excluded due to noindex, canonical, 404, redirects, disallows in robots.txt, anomalies in crawling, etc. Sometimes you have them excluded because you have decided to do so, but occasionally this is the result of some error or mistake.
If so, pass the offending URLs through the URL inspection and request indexing, as mentioned above. In this way, you can accurately control your indexing status and correct possible errors that could be affecting the presence of your URLs on Google.
Sitemaps
This is the section where you can tell Google the exact location of your sitemap file, which offers the search engine a list of your indexable URLs and makes it easy to track and index.
The sitemap file also helps Google to understand your site well and index everything correctly, especially if it is complex site with many URL and has new pages with few links and low authority.
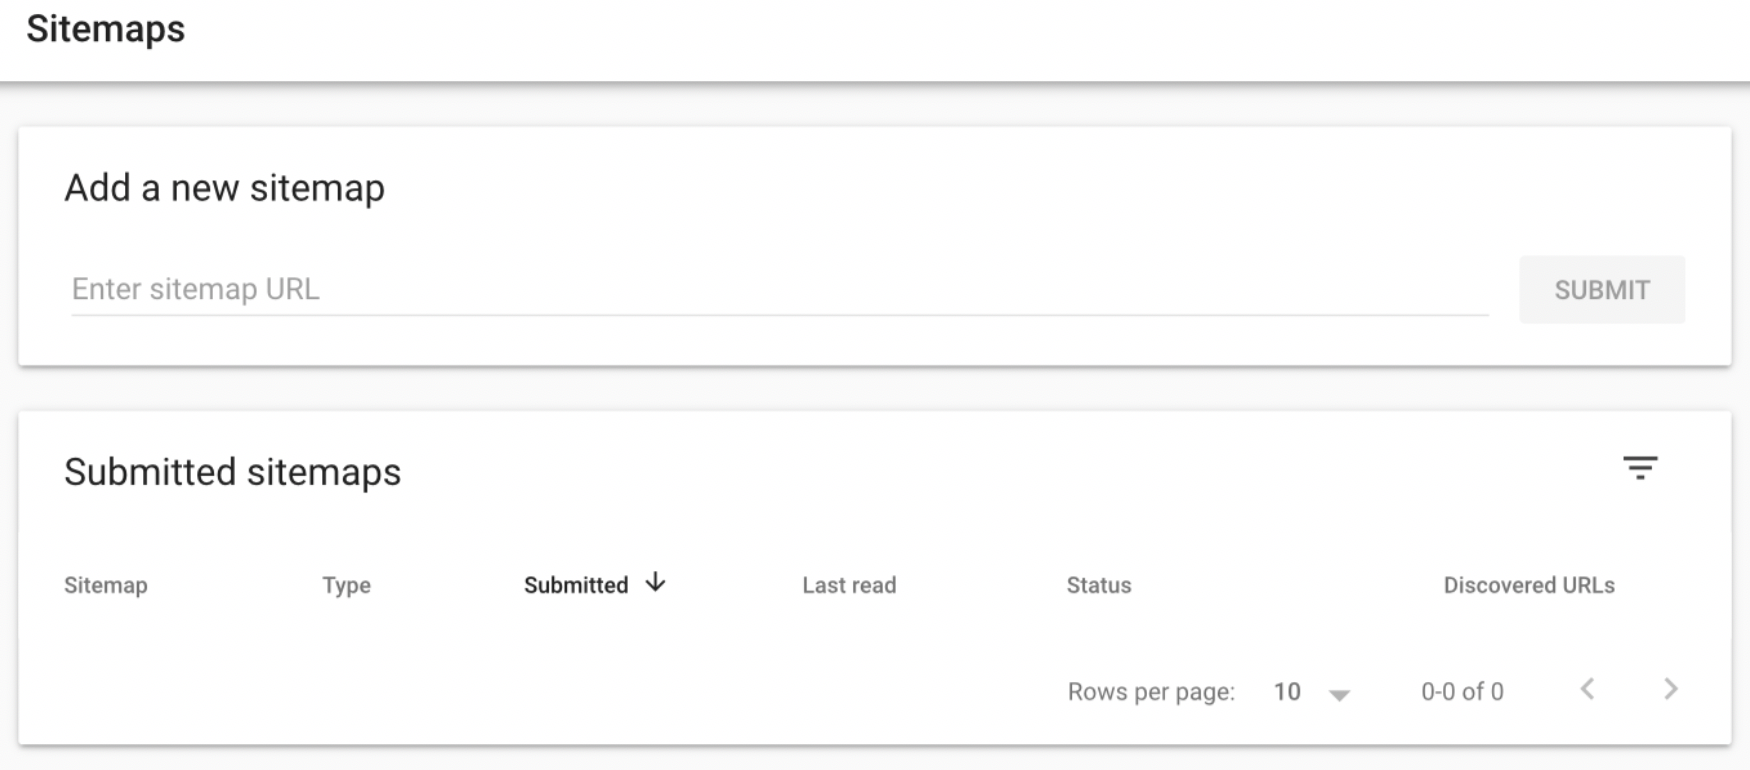
In the add a new sitemap section you must include the complete URL of where you sitemap is located and then click the submit button.
If all is well, the status section will show you that it is has been added correctly.
Mobile Usability
This section notifies you of possible errors related to usability on mobile devices through a graph showing pages with errors and valid pages.
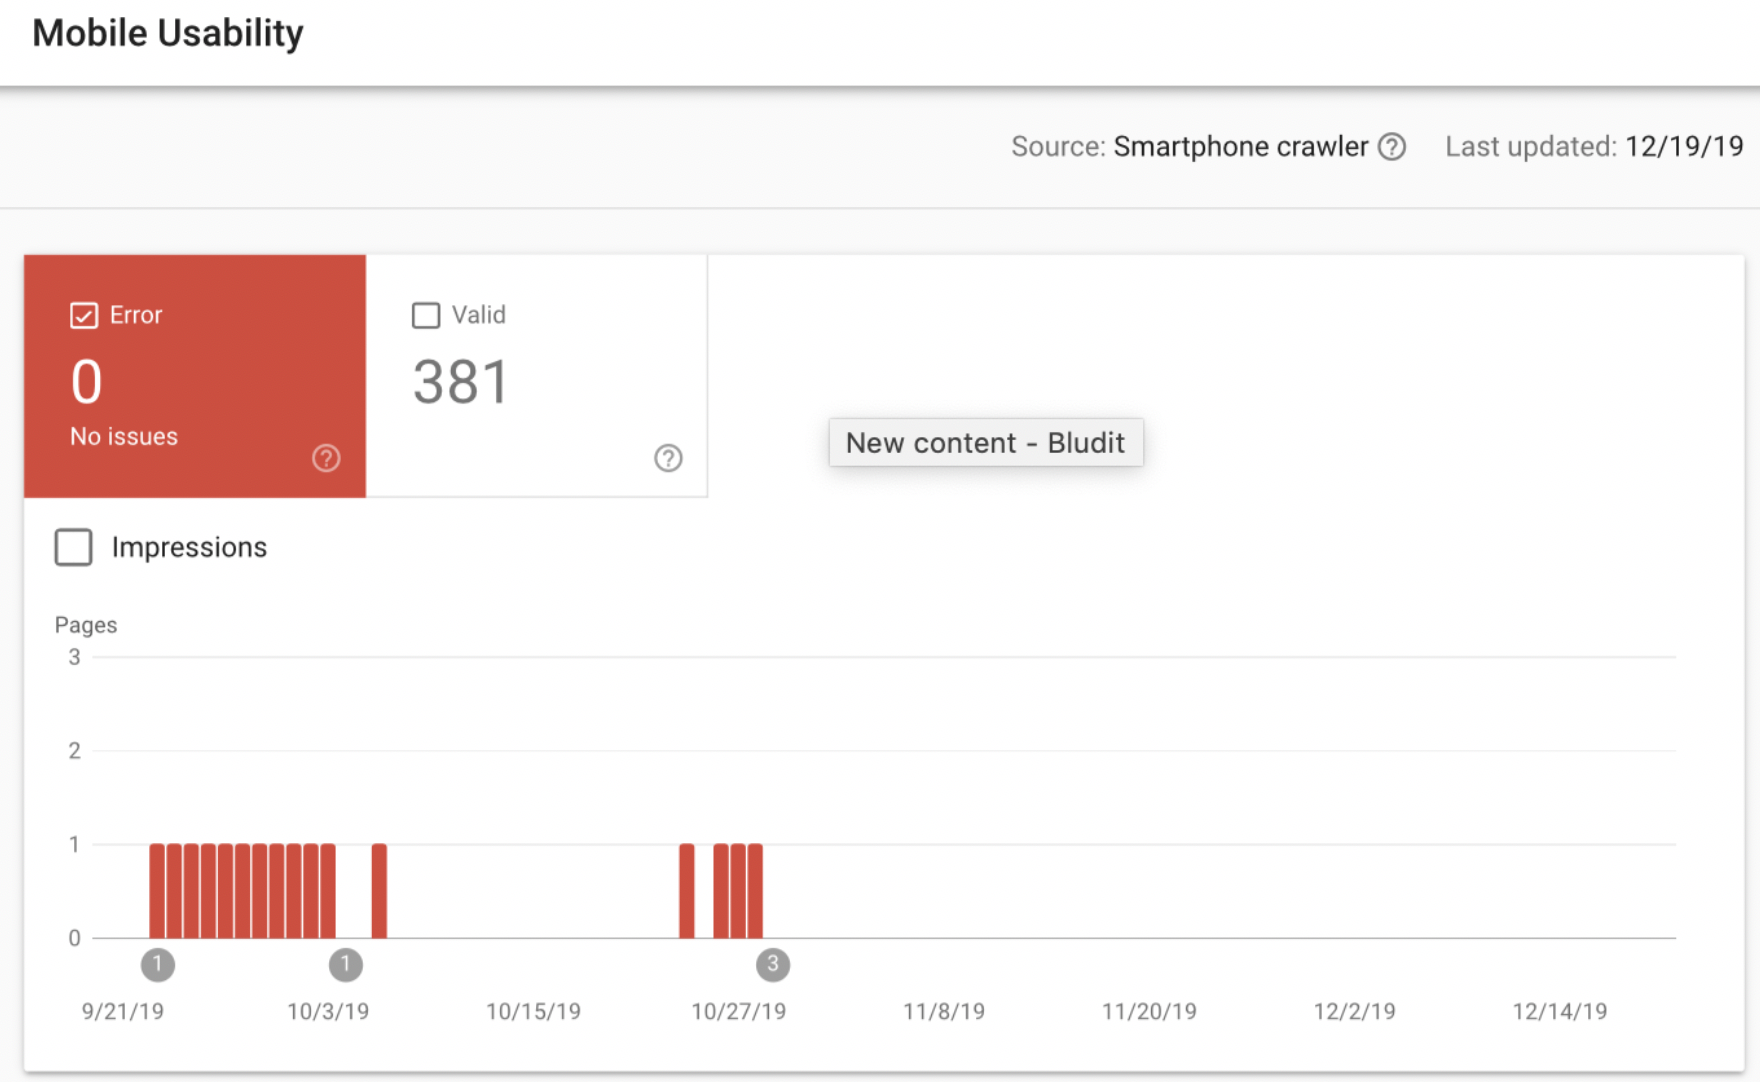
In the details section below, you have a more detailed analysis of each specific usability problem. This allows you to find out the problem and solve it to improve users’ interaction with your website.
Usability is a factor that affects SEO. Easy usability and simple navigation improves user satisfaction and, therefore, the amount of time they spend on site, a lower bounce rate, and higher conversion rates.
Speed (experimental)
This is one of the latest updates to the Google Search console, and is in experimental mode at the time of writing. In simple terms, this page gives you a breakdown of the speed of the URLs on your website for both desktop and mobile in graph form.

By selecting open report you can find more information about the speed status of your website. A moderate page load speed is, according to Google, any page that takes between 1-3 seconds to load. When you select the issues listed within the details section below the graph, you will be able to see all the offending URLs, which can then be optimised to speed-up page load times. You can do this by reducing unnecessary code, compressing images, and avoiding redirects.
Manual Actions
This section helps you to see if you have any penalties from Google. That is, if you have made any suspicious or unnatural SEO practices, Google can punish you by lowering your positions or even de-indexing your content from search results.
Within the section, then, you will see reports on any manual actions on your site and you can try to solve them by sending a request to Google through Request Review, once you have solved the problem causing the penalty.
In this reconsideration request you must explain in detail what you think has happened and show the action you have taken to solve it,
If everything is good you will see the following message:

Security Issues
This section is similar to the previous section, but refers to issues related to any vulnerabilities on your website, injections of code on the site, infected plugins, use of malicious software, spam, phishing, etc. Most of these problems happen involuntarily; that is, they are usually due to the use of unreliable elements of your website, outdated components, or unsafe hosting. Hence the importance of always having a quality server and ensuring your website is continually updated.
In the same way as in the previous section, if everything is correct you will see the following message:

Links
The links section is where you can check the incoming links (backlinks) that exist to your domain, the sites that send you the most links, and the most frequent anchor text in your inbound link profile. You can also check the internal links between your own URLs.
The links are a very important aspect of SEO, since it is one of the key positioning factors. Therefore, it is recommended that you go through this section frequently to check what types of links you have, since you can have good links and bad links, for which you should perform a disavow action as soon as possible.
Another thing you can do in this section is export the list of your external links as an CSV file.
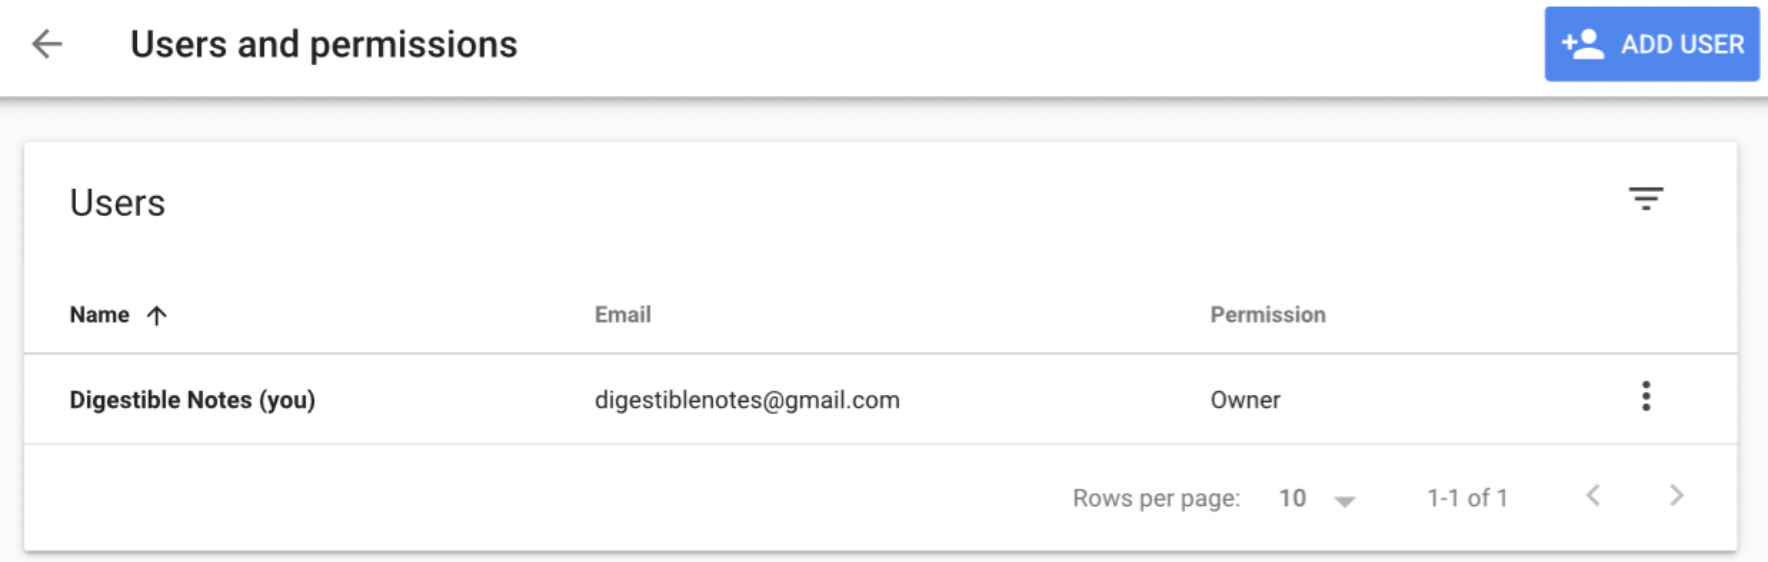
Settings
In settings you can manage your property settings.
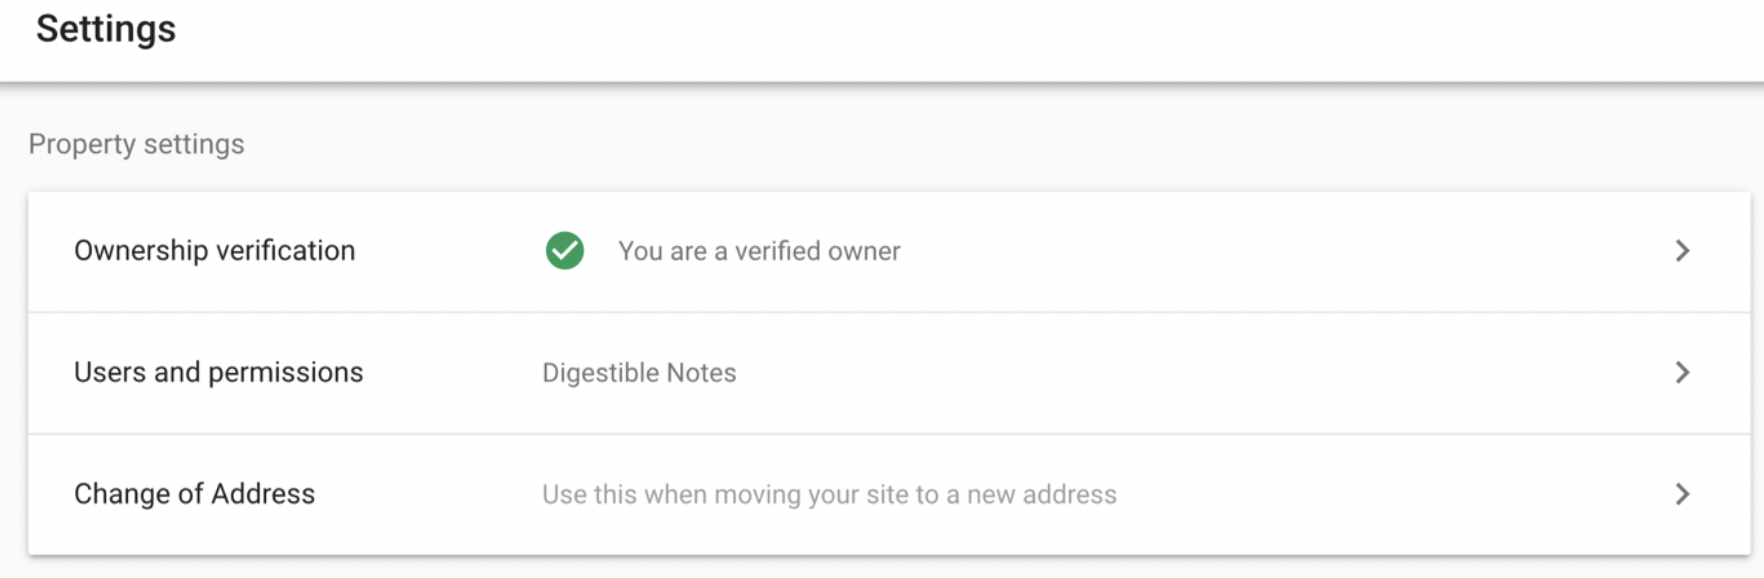
In users and permissions you can manage the owners or administrators of the website. You can add new property administrators through their email or cancel existing administrators.
Submit Feedback
In this section, you have a form to send comments, suggestions, complaints, copyright claims, and more, to Google.
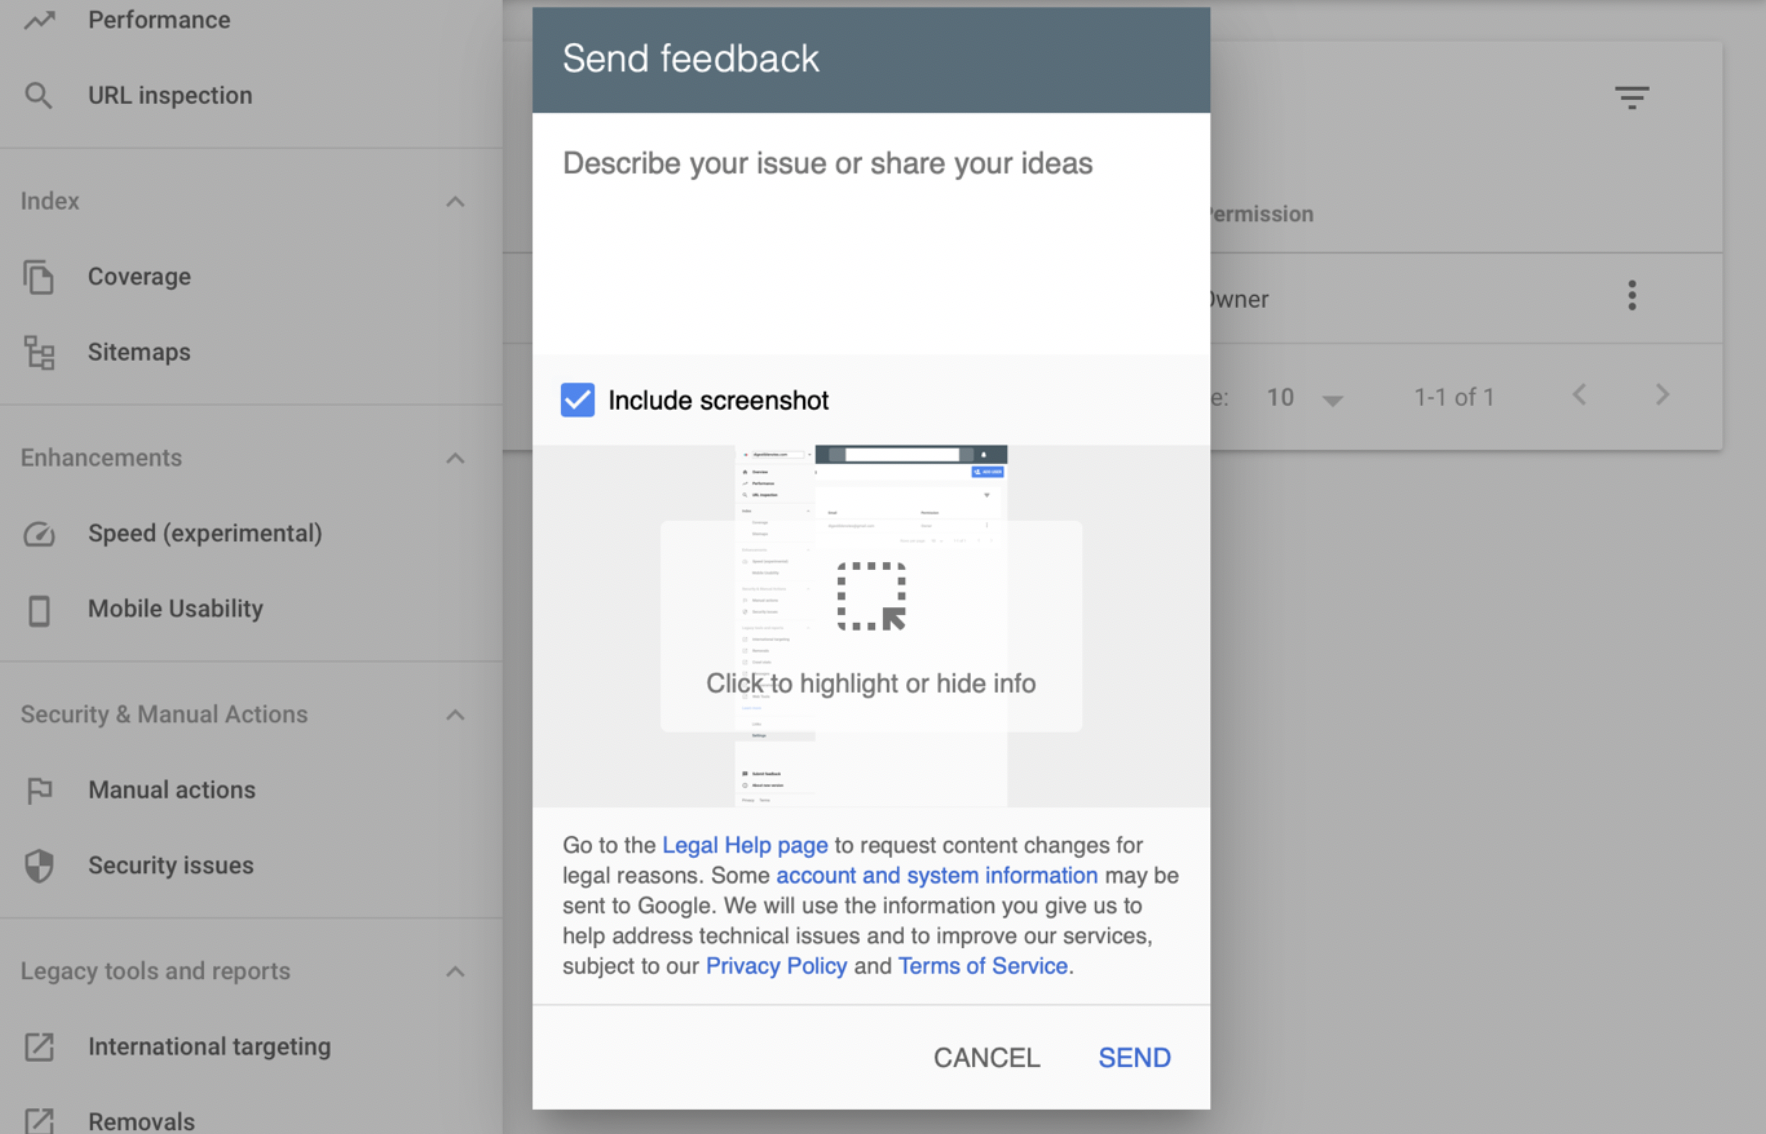
Google is a company that takes user opinion seriously and works hard to offer the best user experience. Therefore, this section is where you should go if you have any problems, and they will take your suggestions and reports into account to carry out the relevant actions to improve your experience.
More...
If you like this content you’re going to love everything else I do. I want to provide you with unbelievable value so you, too, can achieve all your business goals. Let me know what you think of this post and I'd be happy to help any of you guys who may be struggling with your own marketing strategies. Also check me out on Instagram, YouTube, and Facebook.
Currently there are no comments, so be the first!